Disclosure: Vintage Shabby Chic tables post contains affiliate links for your convenience.
Vintage Shabby Chic Tables
Materials Needed:
- Black Sharpie pen
- Decoupage Print
- Plain chalk
- Screwdriver
Staging / Home Decor
Before
These nightstands are actually part of a custom bedroom set. The items are being finished separately so I figured I might as well post about them separately. My customer told me that she wanted to shift the look of these pieces from dark and modern to vintage shabby chic. She decided on a soft, almost sage green. But like most projects it wasn’t quite that simple. Let me first share the before photo, dark right?
My customer had seen previous pieces that I’ve done with the pretty prints on the sides of the drawers, so we decided to add that special little detail as well. BUT.. because there’s almost always a but.. the sides have tracks!
The Process
Oh, my Lord! I almost had a full on panic attack when these were dropped off. So many questions raced through my mind. I kept thinking to myself: “what if I remove the tracks and can’t line them back up again?” “what if they line up crooked and out of whack?” and “what if? what if? what if?” So I took a step back and a deep breath and took this project on in a very methodical manner. I removed the tracks one at a time while labeling the drawer and dresser in chalk since chalk can easily be wiped away once finished. The holes on the sides of the drawers were then marked with a sharpie.
Most of the sides had extra holes so I made sure to mark the holes that the screws were in and ignore the others, otherwise I would’ve scrambled to figure out which were the correct holes and which weren’t. 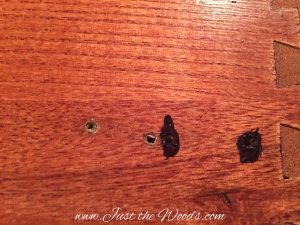
Each set of screws were then separately placed in a small plastic bag and taped to the corresponding track and labeled to make sure it goes back on to the correct drawer and side. Is my OCD shining through yet? Ex. nightstand 2, top drawer, left side. 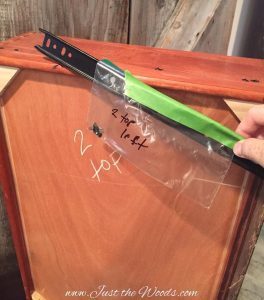
Next, after sanding and prepping the sides I painted a thin coat of Pure & Original island white and marked my holes again.
Then I applied my pretty vintage print and marked my holes yet again. Once the print was sealed I was able to reattach the correct track to each drawer side. 
When I removed the hardware I discovered another surprise.. there were holes requiring filler since the new pulls are gorgeous clear crystal knobs from D. Lawless Hardware and only need one hole.


Paint
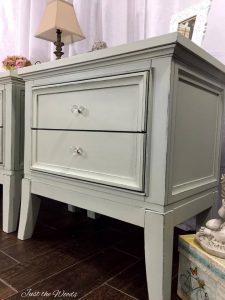
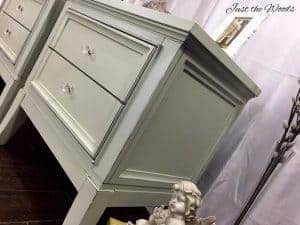
The nightstands were then hand painted in a Pure & Original kiwi white and distressed revealing bits of the dark underneath creating a vintage shabby chic feel. These were then sealed with dead flat eco sealer by Pure & Original. Distressing with sandpaper creates a great worn vintage look. I love the dark coming through the light green!
 These crystal knobs were the perfect choice to go with the new look of these tables.
The Result
 Then, of course, there are the sides!!


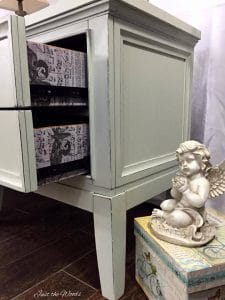

These nightstands truly went from modern to vintage shabby chic. The matching dresser to the set can be found HERE.
Thanks for following along with me. xoxo
I’ll be sharing this post at these fabulous link parties.
Don’t Forget – Follow Just the Woods :
FACEBOOK * INSTAGRAM * PINTEREST
Subscribe to our mailing list here: [mc4wp_form id=”1340″]
PINTEREST PIN READY TO SHARE

Learn to Decoupage : 
Katherine Cruz says
Hi Kandice! Those nightstands are lovely! I’m digging that soft pale green and that hardware. Quick question or two — why did you paint the sides of the drawers before you decoupaged the paper onto them? And two — what adhesive and sealer did you use to make them adhere and not bubble or peel up? I’m working on something that will end up having a poster-sized photo adhered to the front of a dresser. If I can pull it off, I think it will be magical (:-D), but I”m frozen at the adhesive part because I don’t trust modpodge to give me a clean, bubble free look. Thanks! -Kat
Kandice says
hi! thank you! this print is slightly transparent so I painted the white underneath first to give a solid clean background if that makes sense. I used mod podge, if youre bubbling its too thick. use a thin layer and go slow. I added another layer of mod podge over the top and then sealed with the dead flat eco sealer. I do know that the paint line that Ive recently partnered up with (Kristi Kuehl Pure Home Paint) is supposed to be coming out with a decoupage adhesive, so I will definitely be trying it out and let you know.
Mimi says
Thank you for all the steps.
Katherine Cruz says
Sounds good, thank you!
Mimi says
You Rock! Love those nightstands!
I am glad to connect with another OCD angel!
LoL I have driven myself and my husband crazy!
Debrashoppeno5 says
The tables turned out very nice. I like the lines of the table and the paint color brings it out. And then I always love the sursprise when the drawers are open and they are finished in some way.
Kandice says
thank you so much! the tracks were a challenge but worth it in the end 🙂
Grandmas House DIY says
What a lovely makeover! Those drawers are awesome!
Kandice says
thank you so much !! xoxo
Marie, The Interior Frugalista says
Gorgeous makeover Kandice! Love the pretty decoupaged drawers and the paint color is so pretty. Pinning to share ☺
Kandice says
Thank you so much Marie! Have a great weekend 🙂
Carol, The Red Painted Cottage says
I love how it turned out and I especially love the sides of the drawers. Great job!
Kandice says
thank you so much Carol! xoxo
Terry says
Oh, oh, oh! Sooooo much better now! I love how you add more than just paint to a piece! You give each piece something special every time! Lovely! I hope you have an amazing day!
Smiles!
Terry
Kandice says
thank you so much Terry! today is my 3 year old dance recital 🙂 Enjoy your day too xoxo
Mimi says
Kandice I love this so much. I’m forever eyeing off these ugly pieces at thrift stores, and whilst I am creative in many ways, unfortunately my talents do not stretch to furniture makeovers. This just goes to show what can be done. I adore your nightstands now, and who would have thought they’d look so beautiful! Mimi xxx
Kandice says
thank you so much Mimi! I just finished the bed, but unfortunately I dont have a post for it. It was so huge I was unable to take nice photos of it. The customer actually chopped down the poster bed into a headboard and foot board with side rails and the super dark is now pretty and light. Im about to start the matching dresser to the set!
Cassie May says
These are so cute! The decoupaged drawer sides are such a fun idea! Thanks so much for linking up with us at The DIY Collective Link Party! Please come back and party with us again next Thursday! xoxo, Cassie @ Little Red Window
Kandice says
thank you so much! I will do! xoxo
Tuula @ Thrifty Rebel Vintage says
Your furniture makeovers are always amazing Kandice, and this one is no exception. I absolutely love the sage green colour and the sides of the drawers are fabulous. Thanks so much for sharing your talents with us at Vintage Charm. It’s always a pleasure to see what you’ve been up to.
Kandice says
thank you so much Tuula! I always appreciate your sweet words xoxo
Jamie says
Those turned out amazing! I love seeing old things get a new life! Thank you for sharing with us at the #HomeMattersParty
Kandice says
thank you Jamie!!
Ashleigh says
That green looks so good when distressed! Great job!
Thanks for sharing this on Peace, Love, Linkup! Stop on by tomorrow at 6 and share more great content! : )
Kandice says
thank you so much!! xoxo
Christy Alonso says
Very nice, I enjoy your extra touches. What do you sell a set like this for and do you ship?
Kandice says
thank you! this set was customer provided and part of a custom bedroom set (night stands, dresser and bed), and we do offer shipping depending on location
Nancy Neely says
What do you use to distress your furniture ? Nancy
Kandice says
hi Nancy. I love this flexible sandpaper, I get it on amazon – here’s the link: http://amzn.to/290KiRf