This Tailwind Tutorial will certainly increase your Pinterest users and in turn, will increase your blog traffic.
Why I Love Tailwind, How to Use it and Why You Should Too
Disclosure: This Tailwind tutorial post contains affiliate links for your convenience.
I’m sure you can tell already that this is not my normal type of post. If you are not a blogger you may be bored to tears and I won’t be upset if you close this post straight away. But if you are a blogger, and either don’t use Tailwind or are new to it and still figuring it out then I beg you to stick around. 
If you’ve ever popped around my website I have a section called Helpful Info for Bloggers. I may have moved it since my website re-design, but its still there I promise. 
I do realize that I have many resources listed, with attached links but there really is no explanation on what I use each for or how to use them. This is my attempt to remedy that. I can assure you, that all of the resources listed on that page I have used or still continue to use. I wouldn’t recommend something if I haven’t used it myself. Let’s get started with Tailwind!
Getting Started – Tailwind Tutorial
You actually can try out Tailwind for free to see how you feel about it before committing to paying, which is exactly what I did. After the 30 day trial period, I decided that I need this in my life and spent the $120 for the year to continue using Tailwind. Everything that I am sharing is from my account and I feel a bit naked revealing it all. I’m sure others may operate differently, and there may be things that I have missed or haven’t figured out yet, but this is how I use Tailwind for my business.
Once you create an account you will start at the dashboard. 
Every time you complete a blog post, you want to create a pin for Pinterest. Make sure your pins are vertical and visually appealing. There are Virtual Assistants out there to help you if you are graphically challenged. I hired a VA before I started to create my own pins. Once you have your pin its time to add it to your Tailwind account. The first step is to go to Scheduled Pins on the left side. 
Once you click Scheduled Pins then over to the right you will click on Create New Pin, Upload Images. There you upload the vertical pin that you have created. 
Editing Your New Pin
Once you upload your image you will have to edit and fill in the description area and boards. But the most important part is to change the URL pin source to make sure that the pin links back to your post! If you forget to do this, then you pin will automatically link back to your main website page and not the blog post. Don’t ask how I know this, eh hem. I forgot once. 
Once you’ve changed your pin source you can now choose which of your boards you would like to pin to. I also make sure to pin to my group boards. Here is an example of choosing boards to pin to depending on where your post fits. Don’t pin a furniture post in a Food Pinterest board for example. 
Also, make sure to check the box for Twitter, I don’t check the Facebook box because I manually schedule to Facebook separately. 
Next- Add to Tribes. The main thing about Tribes is finding great Tribes to join, and the key to tribes is utilizing them properly by Pinning from them often. Pin both your own content as well as your fellow bloggers. I am a member of a few tribes and even Admin a Painted Furniture tribe. 
After adding your pin to your tribes you can go ahead and Add to Queue. This will add your Pin to your own schedule and your own boards. 
Once I’ve added my pin to my queue I like to shuffle my pins. 
It will ask you if you are sure. You are sure.. go ahead and Shuffle!
Tribes
Like I mentioned previously, the key to tribes is finding quality tribes, with quality content and sharing that content. Many tribes have rules, and often the rules include sharing. No one wants contributors to drop a pin and run – don’t be that person, because it can get you kicked out. When you open your tribe you can see Your own Pins within the tribe. 
This is helpful to clean out your pins after a while to keep the tribe clean. You can also see which of your pins have been scheduled and shared by other contributors and bloggers within the tribe. For example, I can see that this pin of mine has been reshared/ repinned by 5 other bloggers. 
Make sure to go into the Tribe and see what your blogger friends and contributors have pinned and make sure to schedule and pin their content as well. 
Tailwind Features
The reason I love Tailwind is that to be honest, I never paid much attention to Pinterest for the longest time. Shame on me. Now that I am paying more attention to Pinterest I can not do it alone. Tailwind has been huge game changer. There is a Dashboard Overview section with a weekly summary to show my Pin activity. As you can see it tells me how many repins I’ve gotten and compares it to the previous week.
I can also see my profile overview…..

as well as engagement activity…… 
I also get a weekly email letting me know how I am doing. 
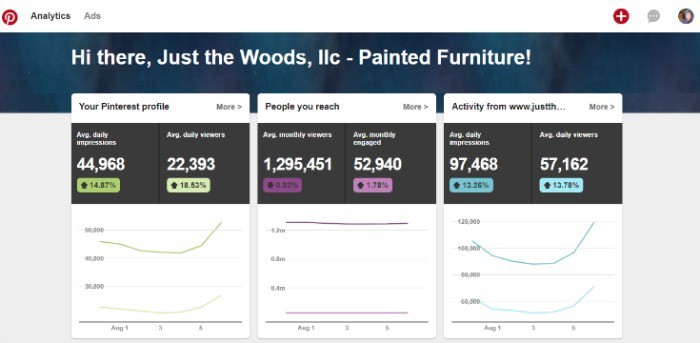
To give an idea of how much this has helped – earlier in the year I only had around 300 Pinterest followers, where now I’m around 1100. These are very small numbers I know. Slow and steady. But since April 2016 until now Dec 2016 my Pinterest average daily impressions has gone from 4018 to 14,135. My average daily viewers has increased from 1932 to 8247. My average daily viewer’s activity from my Just the Woods website has increased from 4369 to 21810. You can see your Pinterest profile info in the Analytics section of your Pinterest Account.
- Traffic Update August 2017 Pinterest average daily impressions is now 44,968. Average daily viewers is now
22,393. Average daily viewer’s activity from my Just the Woods website is now 57,162. That is a major increase and I truly owe it to Tailwind.
-
I hope this Tailwind tutorial has helped with any confusion you may have and if you would like to give Tailwind a try you can check it out HERE.
Don’t Forget – Follow Just the Woods :
FACEBOOK * INSTAGRAM * PINTEREST
Subscribe to our mailing list here: [mc4wp_form id=”1340″]
PINTEREST PIN READY TO SHARE

Marisa Franca @ All Our Way says
Great tutorial! There really is a lot to know about Tailwind that I haven’t delved into. Thank you and I’m going to reread this so I’m pinning and saving it.
Kandice says
Thank you! Its a little intimidating at first, but once you get it all figured out it is a huge timesaver!
Debrashoppeno5 says
Very good advice. I agree with you about using Tailwind and Board Booster. They are great tools.
Tania says
It seems like a lot of work to me… more work than just pinning something… what is the advantage to using Tailwind and/or Board Booster as opposed to just pinning things yourself? Right now I have an excel spreadsheet that I use to keep track and I just go through and pin things myself, it only takes a few minutes each time. Your tutorial is great, don’t get me wrong! I’m just trying to understand and see if this would be advantageous for me. :o)
Tania
Kandice says
hi! I think the advantage is being able to get on and schedule a bunch and then not have to come back again for days. Also using the tribes puts your pins in front of other bloggers who may not see your pins otherwise – giving the opportunity for it to be repinned by ppl with larger followings. I find it to be a huge time saver myself.:)
fancy says
A great tutorial guide!! Am getting started with Tailwind and I must say that your guide is very straight forward.
Thank you for sharing.
Phyllis Robinso says
I have been trying and trying and trying to figure out how to upload the pins. Low and behold O found your post and now I know how to do it!!
Thank you so much !!