How to Make Beach Inspired DIY Soap Bars
Have you ever wanted to know how to make bar soap? These DIY soap bars are so fun to make and they smell amazing. We’ve made a few different batches of soap recipes with different textures and scents. I can tell you that we have given away a lot of our homemade soap to friends and family and they often ask for more. These DIY soap bars are so pretty you may want to keep them all for yourself! 
Disclosure: This DIY soap bars recipe post contains affiliate links for your convenience and I may be compensated if you make a purchase after clicking on my links. Click here for my full disclosure policy.

Supply List for Beach Inspired DIY Soap Bars
Materials Needed / Source List
(Makes 12 Lotion Bars)
- 1 1/2-pounds melt and pour clear glycerin soap (You can find it here)
- 1/2-pound melt and pour goats milk soap (You can find it here)
- 3 tablespoons coconut oil
- 1/3 cup ground oats (these are the ones that I cook with so I already have them in the house here)
- 2 tablespoons shea butter (You can find it here)
- bergamot essential oil -10-20 drops (You can find it here)
- geranium essential oil 10-20 drops (You can find it here)
- chamomile essential oil 10-20 drops (You can find it here)
- Royal blue mica powder color (I used a color from this set here)
- Light teal blue mica powder color (I used a color from this set here)
- Blue jojoba beads (I got mine here)
- **Rectangle soap mold (You can find the one I used here)
- Spray bottle of rubbing alcohol
- Candy thermometer (here)
- 3 medium sized microwave safe bowls
- Find all of my favorite tools and products on my Amazon Page here
DIY Soap Bars Recipe

Soap Making Instructions:
By carefully following these steps you can see how to make soap at home.
Layer One of DIY Soap Bars
Steps 1-4: Add 10 cubes of the clear soap base, coconut oil and shea butter to one microwave safe bowl. Melt in 30-second intervals, stirring after each until it is completely melted. 
Steps 5-7: Place your thermometer in the soap mixture bowl. The temperature needs to be between 125-130 degrees. This is because when the temperature is higher, the soap mixture is thinner, and the oats will sink to the bottom of the mold. Sprinkle a bit of oats into the bottom of the soap mold. When the mixture is the right temperature, add the remainder of the oats and gently stir them in. 
Step 8: Pour your mixture into the soap mold. 
Step 9: Spray top of mixture with rubbing alcohol. Allow it to harden for at least 30 minutes. If you blow on the soap and it doesn’t ripple then you are ready to pour the next layer of your DIY soap. 
Layer Two of Your Soap Recipe
Steps 10-11: Add 10 cubes of the clear soap base to one microwave safe bowl. Melt in 30-second intervals, stirring after each until it is completely melted. Next, add one tablespoon of coconut oil. 
Step 12: Add bergamot essential oil. 
Steps 13-14: Add the darker blue mica to the bowl. Mix thoroughly. 
Step 15: Spray the first soap layer with rubbing alcohol. Don’t skimp on the amount you spray, as this is what helps the layers stick together. But don’t drown it either lol.
Steps 16-17: Pour the darker blue soap mixture into the soap mold. Spray with rubbing alcohol to prevent bubbles. 
Layer Three of Homemade Soap
Steps 18-19: Repeat steps 10-11. 
Step 20: Add geranium essential oil. 
Steps 21-22: Add the lighter blue mica to the bowl. Mix thoroughly. 
Step 23: Spray the second soap layer with rubbing alcohol. Remember not too much and not too little. 
Steps 24-25: Repeat steps 16-17 with the lighter blue mixture. Spray with rubbing alcohol to prevent bubbles.
Layer Four of Beachy Handmade Soap
Steps 26-27: Repeat steps 10-11. 
Step 28: Add chamomile essential oil. 
Steps 29-31: Place your thermometer in the soap mixture bowl. The temperature needs to be between 125-130 degrees.
Add your jojoba beads and gently mix into soap mixture. 
Steps 32: Spray lighter blue mixture with alcohol. 
Steps 33-34: Repeat steps 16-17 with the jojoba beads mixture. Spray with rubbing alcohol to prevent bubbles. 
Steps 35-36: Repeat steps 10-11 with the white soap base.
Steps 37-39: Repeat steps 16-17 with the white soap mixture and spraying the jojoba bead layer with the alcohol. Spray the top layer with the alcohol.

Step 40-42: Allow your DIY soap to set overnight. When you are ready to cut your all natural soap, you can use the tools that come with the rectangle loaf soap mold, or you can use a large knife. Store in an airtight container until ready to use. 
**If you do not have the rectangle mold, that is fine! You can use any mold you like and get the same layered effect. If so, you may need to adjust the amount of soap you use. The important thing is that you have fun! To be honest, we use the soap mold above and when we make super large batches of soap recipes we also use a bread loaf pan or any other mold that we have on hand. 
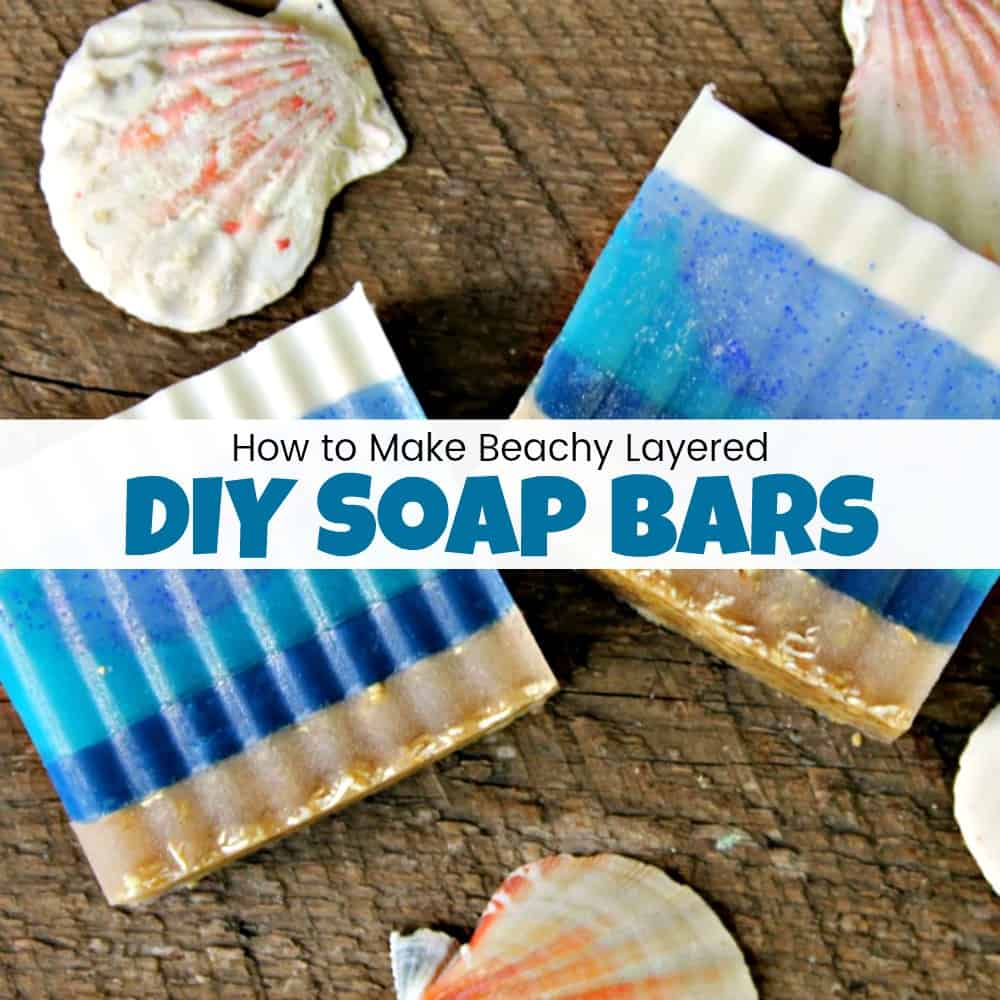
Beach Inspired DIY Soap Bars
These beachy beauties make great gifts or keep them all to yourself. With the summer upon on and vacations underway I can’t help but fall in love with these. These DIY soap bars are great for the beach lover or change up the colors as you wish for any layered look. 


Don’t Forget – Follow Just the Woods and Share this post to Inspire others:
FACEBOOK * INSTAGRAM * PINTEREST
Stay connected! For more tips and tricks sign up here : [mc4wp_form id=”1340″]


Hi Kandice! It is one of the detailed blogs I have read, I am sure the potential user has much useful information to grab.