How to Make the Best DIY Lotion Bar Recipe That Smells Amazing
This DIY lotion bar recipe is not only easy and natural but adorable too! Once you learn how easy it is to make your own lotion bars you won’t need to spend money on pricey lotion that leaves you will greasy or dry skin anymore. Some lotions lead you on with empty promises while others leave your skin feeling gross. This DIY lotion bar recipe is natural and you can make it yourself. When you know how to make lotion bars you will want to make them for yourself, loved ones, family, and friends. Making homemade lotion bars also allows you to be in control of what ingredients you use. 

Disclosure: This lotion bar recipe post contains affiliate links for your convenience and I may be compensated if you make a purchase after clicking on my links. Click here for my full disclosure policy.

Supply List for Pina Colada Lotion Bar Recipe
Materials Needed / Source List
(Makes 12 Lotion Bars)
- Pineapple Silicone Mold
- Coconut Oil – 1/2 cup
- Shea Butter – 1/2 cup
- Beeswax Pellets – 1/2 cup
- Pineapple Essential Oil – 10-12 drops
- Coconut Essential Oil – 10-12 drops
- Vitamin E oil – 5-6 drops
- Yellow Soap Colorant
- Lime Soap Colorant
- Find all of my favorite tools and products on my Amazon Page here
DIY Lotion Bar Recipe
DIRECTIONS
Gather your DIY lotion bar ingredients. I try to use as many natural and organic products as possible. The pineapple mold is absolutely adorable and perfect for making pina colada homemade lotion bars. Find the pineapple mold along with a few other great options for lotion bar molds HERE. 

The first step in making lotion bars is to cut up 4 blocks of shea butter into smaller pieces. This should equal appx 1/2 cup once cut up.

Next, add the coconut oil (1/2 cup) and beeswax pellets (1/2 cup) to the bowl.

Place all of your ingredients into a double boiler pan. If you don’t have a double boiler you can find one HERE. Don’t melt your ingredients without the double boiler! Melt over medium heat, stirring occasionally. 

Remove your mixture from the heat. Add the yellow soap colorant (HERE) and stir well to distribute the color. This will be the yellow for the pineapple section of your homemade lotion bars.

Adding Essential Oils to Lotion
Next, we are adding essential oils to the lotion bar recipe. Add both the pineapple essential oil and coconut essential oil. (Apps 10-12 drops each) as well as the vitamin E oil (5-6 drops). Stir well. If you are new to essential oils I can tell you that I am by no means an expert on them. To be honest, I just like the way they smell for the most part and I like being able to use natural products. I do have some more info that you can find here for the Benefits of Using Natural Essential Oils.

Filling Lotion Bar Molds
Take your time when filling your lotion bar molds. Make sure to spoon the melted mixture into the pineapple base of the pineapple molds. Try not to get any lotion in the leafy part of the mold. Place the lotion mold in the refrigerator and chill for 30 minutes. Set aside the remaining melted beeswax lotion for later use. Don’t worry if the extra lotion mixture hardens.

After 30 minutes remove the silicone lotion mold from the refrigerator. Melt the remaining hardened lotion that we set aside again in a double boiler. Once completely melted, add the green food colorant to the liquid.

Stir well and add more green colorant until you have a shade of green that you love. This is the green for the pineapple leaves section of your DIY lotion bar.

Next, pour the melted green lotion on top of the hardened yellow lotion of the pineapple and into the leaf part of each mold. Make sure to fill each mold to the top. Chill again for 30 minutes to allow the lotion bars to completely harden.

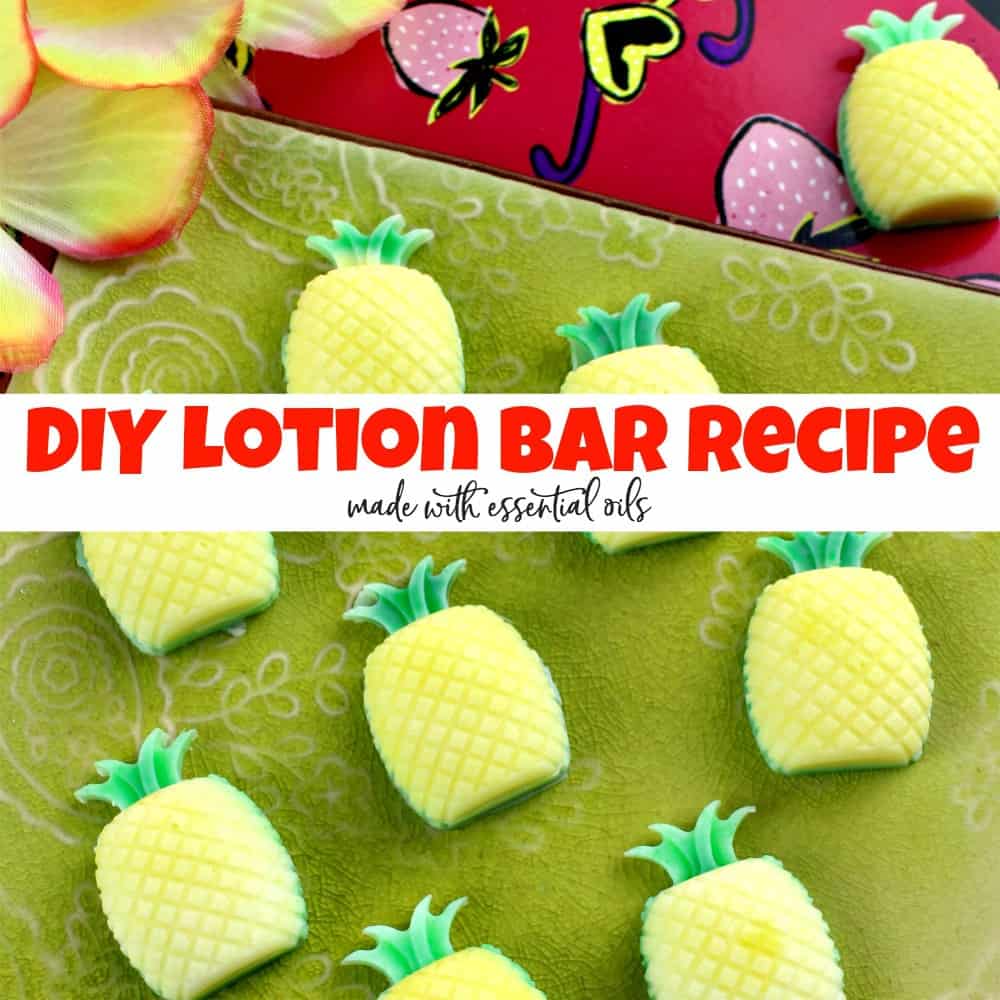
Finished Pina Colada Lotion Bars
Once the lotion bar recipe has fully hardened in the mold you can gently pop out each pina colada lotion bar from the pineapple molds and store in a cool and dry place.


Essential Oil Lotion Bar Recipe You Will Love
Aren’t these adorable lotion bars? You can make a few batches to share and gift to friends. The pina colada scent is perfect for summer after a day at the beach or maybe in the winter when you are craving that warm weather. 


One Comment