• Home
    • About
    • Services & Policies
    • Just the Woods Media Kit
  • Furniture
    • Past Painted Projects- SOLD
  • Shop Products
    • Shop Wise Owl Chalk Synthesis Paint
    • Shop Dixie Belle Chalk Mineral Paint
    • Shop my Favorite Tools & Supplies
    • eBook
  • FREE Stuff
    • Affordable Back Drop Options
    • How to Paint Furniture – A Beginners Guide
  • Learn
    • Video Tutorials & Downloadable eBooks
  • Blog
    • Recipes
    • painted furniture
    • DIY / Crafts
    • Home Decor
    • Monthly Social Blog Hops with the Best DIY Blogs
  • About Me
    • Nutrition & Health Coaching
  • 0 items

Just the Woods, LLC | a Colorful Home & Healthy Lifestyle Blog

a Colorful Home & Healthy Lifestyle Blog

  • Blog
  • Recipes
  • Nutrition & Health Coaching
  • Painted Furniture
  • DIY / Crafts
    • Home Decor
  • About Me

How to Spruce Up the Garden with Raised Garden Beds

Share & Save for later!

143 shares
  • Share51
  • Tweet
  • Email

Spruce Up the Garden with Stenciled Garden Beds

In our home, we do more than just paint.  We compost our food scraps and use it in our garden.  In our garden, we grow strawberries and tomatoes as well as many other things. With our tomatoes, for example, we make our own sauce.  We also home brew beer and make wine.  These are just some things that we enjoy.  This weekend was geared towards taking care of the yard and garden by building raised garden beds.

Materials Needed:
Disclosure: This garden post contains affiliate links as well as sponsored links from Cutting Edge Stencils. All opinions are 100% my own. 
  • wooden boards- 2x10s and 1x3s
  • terra cotta pots
  • mulch
  • garden soil
  • stencil

Time to Spruce up That Garden

We have one raised garden bed on the small side yard but we also have some wasted space in between the patio and the fence that we plan to take advantage of and make useful.  See that area behind the patio? Wasted and unattractive!!

How to Build Raised Garden Beds How to Build Raised Garden Beds

We started off by taking a trip to the big store with the wood and all the garden goodies! You know the one.

How to Build Raised Garden Beds with Just the Woods How to Build Raised Garden Beds with Just the Woods

We picked up some lumber (2 by 10’s and 1 x 3’s) and a few terra cotta pots, mulch, and soil.

How to Create a Stacked Strawberry Garden  How to Build Raised Garden Beds How to Build Raised Garden Beds

Stacked Strawberry Planters

First, the terra cotta pots were painted and sealed in a slight teal ombre.

How to Create a Stacked Strawberry Garden

Starting with the largest pot we added potting soil, then another pot, then soil, then a pot etc.  Once they were all full we planted the strawberry plants around them for a stacked strawberry garden. The rod down the center prevents the stack from falling over. This will go right in the corner of the yard.How to Create a Stacked Strawberry Garden

It’s a Family Affair

My daughter wanted to paint too, so I set her up on the side with plastic garden pots, a brush, and cup of paint and let her make a mess..  and she sure did make a mess.Let the little ones paint too while working in the garden

Which was perfectly fine, since I also made the kids clean up! This kept them busy for a while since the paint has great “sticking power” even with soapy water and scrubby sponges they couldn’t get it all off.  Is it mean that I found this part amusing?  🙂
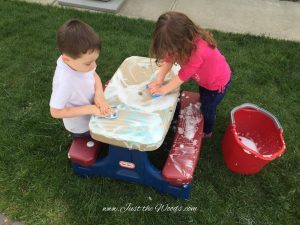
clean up

Pedestal Planters

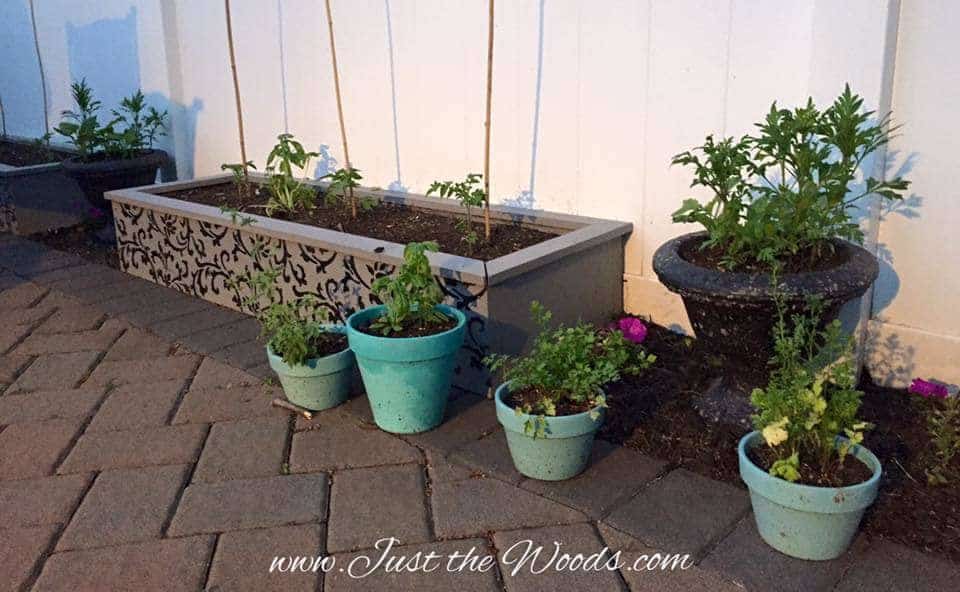
We also picked up two pedestal style planting pots, but they were a cream color.  I figured cream would blend right in with the white fence so to darken them up I painted and sealed them in black.  Since the pots had texture to them, I made sure not to fully cover them with the paint leaving a stone like appearance.  These were then filled with soil and little sprouts that will bloom into colorful decorative flowers.Painting Garden Planters by Just the Woods

I also took a few smaller sized terra cotta pots and painted and sealed them in a softer blue for the herbs – oregano, basil, parsley, and cilantro. Spruce up the Garden with Raised Garden Beds / paint, stencil, seal by Just the Woods

Raised Garden Beds

While I worked on getting the painting done my husband was busy building the raised garden beds.  He wasn’t satisfied with plain boxes so he added a small trim along the tops.How to Build Raised Garden Beds

Once the beds were built I painted them in a neutral gray, since we already had enough blue.  I then added the Victoria Scroll all over stencil design from Cutting Edge Stencils across the fronts in black to compliment the stone pedestal pots that will be placed in between them. The idea was brought up to do the stencil in white, but knowing that this is a garden, in the yard and outside I opted to avoid white in fear of it becoming dingy looking over time.How to Build Raised Garden Beds

Once all were finished we added potting soil inside them and mulch on the sides of them. Everything was put in its place ready for seeds and plants to be added. How to Create a Stacked Strawberry Garden

How to Build Raised Garden Beds

How to Create a Stacked Strawberry Garden How to Build Raised Garden Beds How to Build Raised Garden Beds How to Build Raised Garden Beds

The raised garden beds will be filled with tomato plants as well as peppers, while the small pots are filled with herbs.  We had 65 lbs of tomatoes last year with just the side garden, we now hope to get 100 lbs for sauce making later in the year!How to Spruce up the Garden with Paint, Pots & Wood

*Update*

**Approximately ONE month later our garden has gotten a lot of spring rain, we have some sprouting and the garden beds are looking great!**

Update the yard with raised garden beds - Paint, stencil and sealed by Just the Woods

*We have Peppers*

Now that we are into the summer and crops are bursting we have a great bed of peppers. How to Grow Peppers in a small yard

We will soon be preparing for sauce making.  As expected we have harvested approximately 100 lbs of tomatoes from the yard.  This photo is just an example of the first batch brought inside. Grow Your Own tomatoes to make sauce

Make sure to check out how we compost to feed our garden with Coffee Grind Compost

You can find this stencil as well as many others at cutting edge stencils

You can find our post on the Cutting Edge Stencils Blog here.

If you like these paint colors you can DIY and get the look here with Stone, Derby, and Jade. Make sure to seal them against the elements with a protective finish.

I’ll be sharing this post at these fabulous link parties.

Don’t Forget – Follow Just the Woods and Share this post to Inspire others:

FACEBOOK  *  INSTAGRAM  *  PINTEREST

Subscribe to our mailing list here:

Feel Free to Pin!

Spruce up the Garden with Raised Garden Beds / Build, Paint, Stencil, Seal by Just the Woods

More from my site

  • Nesting Tables Makeover with Unique Watercolor LookNesting Tables Makeover with Unique Watercolor Look
  • The Ultimate Guide for Stunning Painted Furniture IdeasThe Ultimate Guide for Stunning Painted Furniture Ideas
  • How to Create Fabulous Painted Furniture with Cutting Edge StencilsHow to Create Fabulous Painted Furniture with Cutting Edge Stencils
  • How to Paint and Decoupage FurnitureHow to Paint and Decoupage Furniture
  • Whimsical Painted Furniture – A Colorful Tutorial You’ll LoveWhimsical Painted Furniture – A Colorful Tutorial You’ll Love
  • 6 Super Easy Steps to Make a Custom Address Plaque6 Super Easy Steps to Make a Custom Address Plaque

Share & Save for later!

143 shares
  • Share51
  • Tweet
  • Email
« Thin Blue Line Painted End Tables
Glam Farmhouse Style Table »

Comments

  1. Michele says

    May 1, 2016 at 6:07 pm

    Looks wonderful! What paint did you use on your pots?
    What did you use to seal the pits after you painted them?
    They would be perfect in my backyard for a pop of colour.

    Reply
    • Kandice says

      May 1, 2016 at 6:47 pm

      I sealed them with a clear varnish. pits lol 🙂

      Reply
      • Mimi says

        May 2, 2016 at 12:03 am

        Thank you!

        Reply
    • Kandice says

      May 29, 2016 at 4:45 pm

      Michelle. Ive recently become a retail partner with Kristi Kuehl Pure Home Paints. You can order paint and finishes on my website if youre interested 🙂

      Reply
  2. Michele says

    May 1, 2016 at 6:08 pm

    That should read
    What did you use to seal the pots! Not pits!

    Reply
  3. Rachel Osborn says

    May 2, 2016 at 2:08 am

    I love how you did the stacked pots in an ombre look-did you mix your own paint colors as you went on? Thanks for adding this great post to the Family Joys Linky Party! Hope to see you linkup again!

    Reply
    • Kandice says

      May 2, 2016 at 2:32 am

      thank you and yes. After each pot I lightened a little for the next pot and next pot and so on. 🙂

      Reply
  4. Chelc | Inside the Fox Den says

    May 3, 2016 at 2:32 am

    Your backyard looks great! Thanks for sharing at Merry Monday, hope to see you again next week!

    Reply
    • Kandice says

      May 3, 2016 at 4:41 am

      thank you!! see you next week 🙂

      Reply
  5. Lori says

    May 3, 2016 at 12:08 pm

    What a difference! Love the colors and design! Thanks for sharing at Dishing It & Digging It!

    Reply
    • Kandice says

      May 3, 2016 at 2:26 pm

      thank you Lori! Looking out in the yard makes me smile now 🙂

      Reply
  6. Laurie says

    May 5, 2016 at 3:41 am

    I love what you did with the containers! Your yard looks wonderful! I love the pop of color with the pots. Pinning to share 🙂 Thanks for coming over and sharing your post with us for Snickerdoodle Sunday!

    Reply
    • Kandice says

      May 5, 2016 at 3:41 pm

      thank you so much! Its a challenge to maximize space in a small yard and not make it look crazy 🙂

      Reply
  7. Nikki Gwin says

    May 5, 2016 at 8:45 pm

    I love all 3 pot variations! Your patio is gorgeous and your GRASS is so lush! Happy Spring! 🙂 gwingal

    Reply
    • Kandice says

      May 5, 2016 at 10:07 pm

      thank you so much!!! xoxoxo

      Reply
  8. hilary says

    May 27, 2016 at 4:52 am

    Love this idea!! What type of paint did you use on the terra cotta pots?

    Reply
    • Kandice says

      May 27, 2016 at 4:55 am

      thank you so much! You can actually find and order the paint here on my website now! here’s the link:
      https://www.justthewoods.com/kristi-kuehl-shop-pure-home-paint-finishes/

      Reply

Leave a Reply Cancel reply

Your email address will not be published. Required fields are marked *

Meet the Artist

Meet the Artist – Hey there and welcome to my blog!

Click Here to get to know me better and visit my blog.

Click to Order Furniture Paint

dixie belle, dixie belle paint, chalk paint, chalk mineral paint, order paint, order dixie belle
wise owl, wise owl paint, chalk paint, chalk synthesis paint, furniture paint, non toxix paint

Categories

Copyright


All content on this blog is the property of Just the Woods, LLC. You are welcome to share my content (to include one photo only) as long as you provide a link back the original post. DO NOT copy entire posts, or crop, edit, or remove watermarks from photos without written permission from me first. Sharing a post from Just the Woods in a capacity where YOU will be compensated is not permitted. Thank you!

  • Privacy & Disclosure

QUICK LINKS

  • Home
  • About
  • Services
  • Galleries
  • Contact Us

OUR LOCATION

Staten Island
New York
10314
United States
[email protected]

Copyright © 2022 · Market Theme on Genesis Framework · WordPress · Log in

143 shares
  • Pinterest
  • Facebook
  • Twitter
  • Email