How to Paint Stripes Perfectly on Painted Furniture
Transforming your painted furniture with decorative stripes can breathe new life into its appearance, adding flair and personality to your piece. Whether you’re aiming for a classic, timeless look or a more modern and bold statement, painting stripes on your painted furniture offers endless possibilities for creativity and customization.
With just a few tools, a bit of patience, and a touch of artistic vision, you can achieve stunning results that will enhance the aesthetic appeal of your furniture. In this guide, I’ll walk you through the step-by-step process of painting stripes on painted furniture, covering everything from preparation to finishing touches.
If you have been painting furniture for some time, or even if you are new to it then you may have or want to know how to paint stripes. A clean crisp line is the key when you paint stripes on furniture. That along with proper spacing. Guess what? I’m going to show you how to paint stripes perfectly, and flawlessly and it’s super easy.

Supplies & Tools Needed to Paint Stripes on Painted Furniture
Disclosure: This post contains affiliate links for your convenience. Click here for my full disclosure policy
You will need a few items and tools to paint stripes on your furniture. This is a list of all tools and paint products used in this tutorial:
- Zibra Paint Brushes or Cling On Brushes
- Furniture Clamps
- Painters Tape
- Lint Free Cloth
- Find all of my favorite tools and products on my Amazon Page here
- Dixie Belle Paint
- Wise Owl Paint
- Modern Masters Metallic Paint
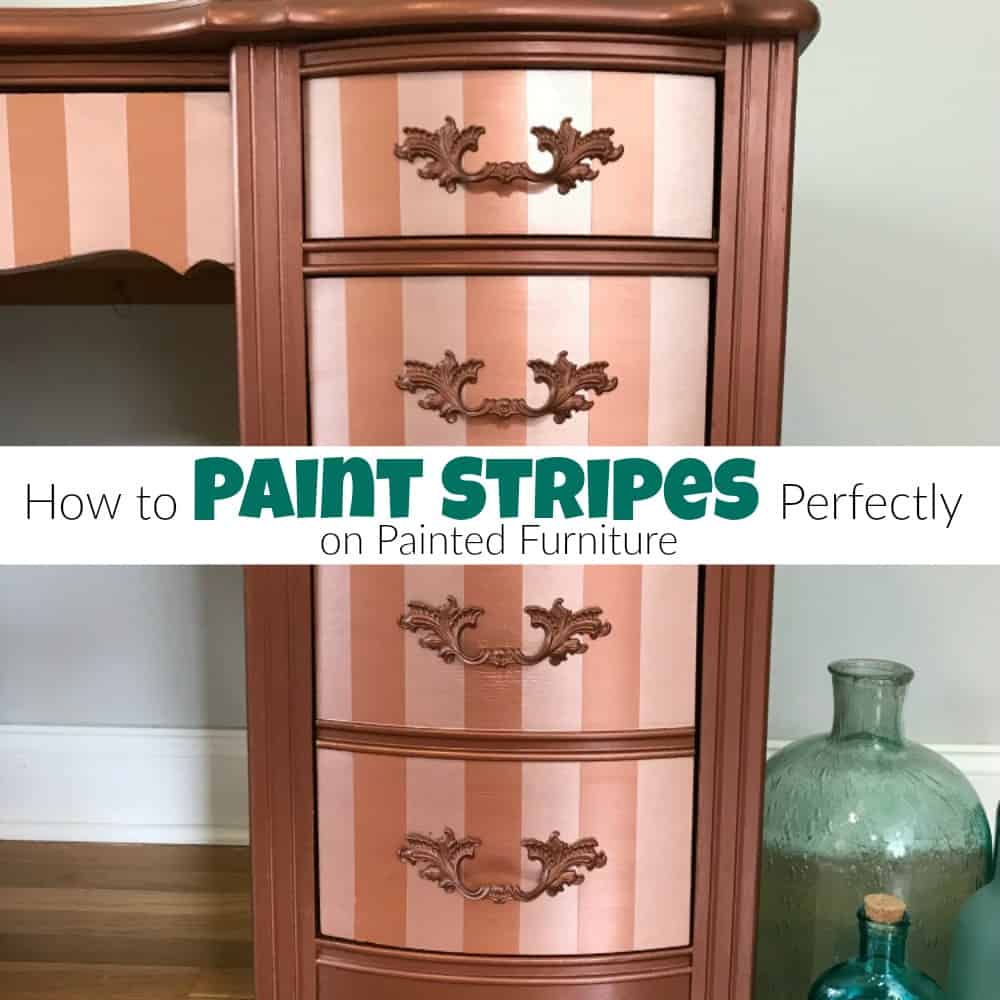
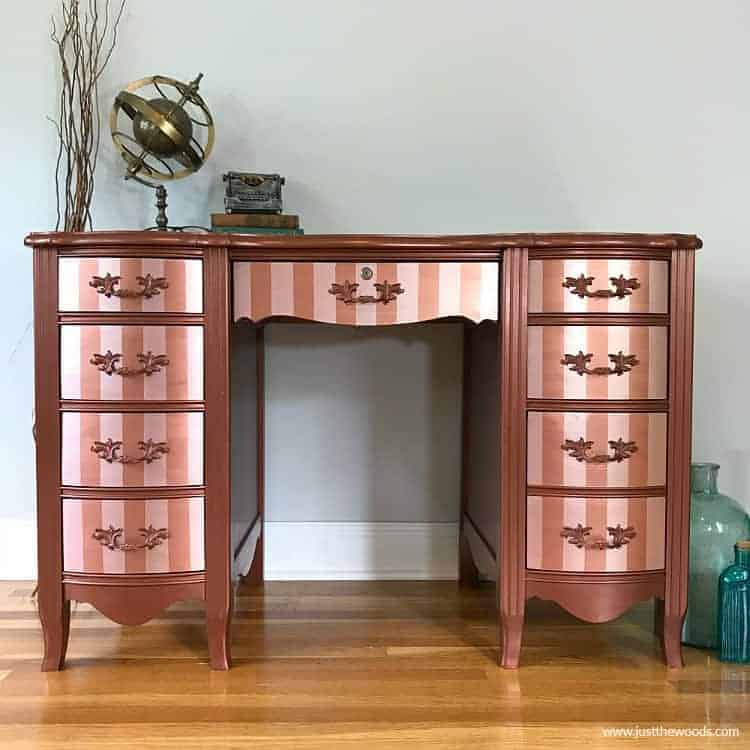
Before we begin painting stripes, you will need to decide where you intend to add stripes. By this point, you should have a piece of furniture in mind for the makeover. For this example, I am using this gorgeous wooden desk. The drawers are begging for painted stripes. Don’t you agree?

If you are new to furniture painting and want to learn how to update old furniture with paint you can always start at the beginning with How to Paint Furniture – a Beginners Guide.
Check out all of my furniture projects with over 90 painted furniture makeovers: Stunning painted furniture ideas.
Adding Stripes Painted Furniture
I’m going to assume that like anything, there is more than one method to paint stripes. This particular method is the one that I like because it’s so easy and almost feels like cheating. So, if you have never added stripes to your painted furniture makeovers before I am going to show you the easiest method I know how to get this done perfectly.
Setting Up to Paint Stripes
If you are painting stripes on removable drawers you will want to label the drawers when you initially remove them from your piece. I like to do this with a plain white piece of chalk under the drawer bottoms. Next, we need to line our drawers up on a flat surface like the flood. Labeling the drawers allows us to know which drawer goes where. Make sure to line up the drawers in the order that they would go back into the desk when finished.

Carefully, use an extra-long clamp to clamp the drawers together. I am using these extra-long clamps. You can find some like these online HERE.

Next, you will need to grab your painters tape. Not sure what tape to use for painting stripes? Well, just make sure to use quality tape that won’t allow the paint to bleed underneath.
My favorite painter’s tape is Scotch Platinum and Green Frog Tape. Either will work. Carefully, lay the tape down vertically on your drawer fronts. Make sure to lay it straight all the way down the drawers. Do lay the tape as close to one another as possible but do not overlap.

Spacing Your Tape to Create Stripes
This next step is how I manage to create perfectly spaced stripes. You will now peel away every other piece of tape. I know, this may seem wasteful since we are laying the tape down just to peel it off. But, sometimes we do things just to make life easier. This is one of those things.
And if this is the price to pay to keep from having to measure each tiny inch or centimeter then I am all for it. This method also keeps me from losing my mind and stressing over measurements, not to mention saving time by not having to measure as well.

As long as you lay your paint down nice and straight, you will be left with perfectly spaced stripes!

Separating the Drawers Before Painting Vertical Stripes
Now we need to separate the drawers. You don’t want to paint stripes with the drawers clamped together. So, grab a sharp blade, like an Exacto knife, and carefully slice the tape between the drawers so you can separate them. I keep a supply of these with extra blades in my shop so that I always have a fresh blade. This is the one that I have HERE.

A fresh blade will ensure a crisp cut every time.

Once you do this for every drawer you will need to go back and gently press down your tape to make sure that there are no lifted spots or bubbles.
If you have any tape that is not fully secure you could end up with messy lines instead of the perfect crisp lines that you are aiming for.

Once you finish securing your tape you can finally separate your drawers with confidence and we can move on to paint stripes.

Painting Vertical Stripes
For these painted stripes I am using Modern Masters rose gold metallic paint. It is the perfect color to compliment the copper of the rest of the piece.

Carefully go ahead and apply thin coats of paint to your drawers using a clean brush.

To play it safe try to start at the tape and paint away from the tape rather than towards it. Do this so that you don’t accidentally catch and lift the tape. By brushing away from the tape we make sure that our paint lines stay crisp.

Depending on what type of paint you are using for your project you may need another coat of paint. For this project, I apply two coats of the rose gold paint to the drawers.

As soon as you finish painting your stripes you can go ahead and remove the remaining painter’s tape. I don’t like to wait very long after painting. I feel like the perfect time to remove the tape is when the paint is still tacky – not quite wet, but not quite dry.

The reveal is always the most fun part of the project. Here is a quick video showing you how to paint stripes on furniture. If for some reason, you are unable to see the video you may need to turn off ‘ad-blockers’ on your site. The video may also autoplay within the tutorial post.
Additional Tips When Painting Stripes on Furniture
A few things to keep in mind for this project example. Depending on the paint products and tape you use, you may have different results.
- I did NOT apply any type of sealer to the base paint before adding stripes
- the stripes come out crisp and perfect
- the paint under the tape did not lift or peel at all
Now that you have added stripes to your painted furniture make sure to go ahead and add a sealer or topcoat of your choice to complete the makeover. If you ever have questions about sealing your painted furniture project you can find a full tutorial with a video on how to apply clear sealer here: Sealing Painted Furniture

Painting stripes on painted furniture is a fantastic way to add personality, style, and visual interest to any room. Through careful planning, precise execution, and a bit of creativity, you can transform ordinary furniture into eye-catching pieces that reflect your unique taste and flair for design.
As you finish your project, step back and admire the transformation you’ve achieved. Whether you’ve opted for subtle, understated stripes or bold, dramatic patterns, your efforts will undoubtedly breathe new life into your furniture.
Remember, the key to success lies in attention to detail and patience throughout the process. Take your time, enjoy the creative journey, and revel in the satisfaction of turning a simple piece of furniture into a work of art.
If you would like to see the entire makeover of the desk project used to explain the striping process make sure to check it out here: How to Paint Gorgeous Furniture with Modern Masters Metallic Paint.

Don’t Forget – Follow Just the Woods and Share this post to Inspire others:
FACEBOOK * Furniture INSTAGRAM * Healthy Food INSTAGRAM * PINTEREST * RECIPES