
How to Paint Furniture with Modern Masters Metallic Paint
If you love glamorous shimmer then you need to check out Modern Masters metallic paint. The gorgeous subtle shine added to painted furniture with metallics gives your makeover the perfect touch. For this project, I am taking you through the entire process of creating an entire metallic makeover using Modern Masters metallic paints on an old wooden desk.

Disclosure: This post on how to paint furniture with Modern Masters metallic paint refinish is sponsored by Modern Masters, Inc and contains affiliate links for your convenience. Click here for my full disclosure policy.

Supplies & Tools Needed to Refinish Furniture
Materials Needed / Source List:
Tools
- Zibra Paint Brushes or Cling On Brushes
- Furniture Tri Wheelies
- Sandpaper
- Bondo Filler
- Furniture Clamps
- wood glue
- Orbital Sander
- Shop-Vac
- Lint Free Cloth
- Find all of my favorite tools and products on my Amazon Page here
Paint
- Modern Masters
- Warm Primer
- Antique Copper – metallic paint
- Copper Penny – metallic paint
- Rose Gold – metallic paint
- Master Clear Sealer
Before we begin painting a wood desk, this makeover is part of our monthly Furniture Fixer Uppers share. You know what that means! Make sure to stick around all the way to the end for more great painted furniture before and after projects.
Check out all of my furniture projects with over 90 painted furniture makeovers: Stunning painted furniture ideas.
Unfinished Wooden Desk
If you have been following my work for a while then you know that the majority of my projects and makeovers are donated. Because I donate them, I tend to work on smaller pieces. But this wooden desk is just too pretty to pass up. I scooped it up from one of those Facebook groups because those are always great for finding old pieces to makeover.

I even joke on my Facebook page about the excitement of scooping up a great new piece of furniture. 😛

Condition of the Wooden Desk
But with a great piece of old furniture often comes both good and bad. Let’s go over the good first.
- the desk is all wood
- all of the drawers open and close smoothly
- the hardware is all here
- someone lined the inside of the drawers to keep them in great shape


This is awesome because even though the drawers aren’t in perfect condition they are certainly in better shape than most. Even better, the liner is simply placed in the drawers and easily lift out for removal.

Now, the bad. There is a little bit of damage requiring repair. One of the drawers has a bit of damaged/missing veneer. But thankfully, we can easily fix this.

There is also a bit of scratched/damaged wood where the center drawer must’ve rubbed the desk frame. Again, we can fix this.

Starting Prep for Painting Furniture
Let’s start the repairs. First, we need to remove the drawers. To keep things organized I like to grab a simple piece of chalk at this point. Use the chalk to label and mark the underside of each drawer so that when its time to put everything back together they all go back where they came from.

Next, remove all of the hardware from the drawers. I am using my nifty ratchet screwdriver from Rolgear. You can find this online HERE.

Repairing Damaged Veneer
Now let’s fix this damage. Grab your favorite wood glue. I am using this Gorilla glue for our furniture repair.

Carefully, squeeze wood glue into the space where the veneer is separating.

Clamp the wood tightly with a small wood trigger clamp. These are the clamps that I use HERE.

Using a damp cloth make sure to wipe away the excess glue to avoid a mess.

You may need to add a second clamp. 😉 It would be best to leave the clamps in place overnight to allow the wood glue to fully dry before you release them.

Wood Filler Repair
While we wait for the wood glue to dry let’s break out the Bondo. This has become my ‘go-to’ for repairing damaged wood. You can see a more in-depth tutorial on how great it works for repairing wood furniture in How to Repair Furniture with Bondo Wood Filler.

Simply mix up your Bondo on a paper plate.

Use a plastic spoon, or something similar to apply your Bondo mixture to the damaged wood.

Immediately, smooth out the Bondo before it begins to dry. This stuff dries quickly so you must work a little faster than it does.

Once the Bondo is fully dry you will need to sand it smooth. Also, when the wood glue on your drawer front is fully dry make sure to repeat these same steps to fill in the area where the veneer is missing.

Prepping Furniture for Modern Masters Metallic Paint
Now that the repairs are taken care of we can start on the next step in the prep work. Some say we don’t need to prep our furniture but I always like to prep no matter what. I’m starting with a 120 grit piece of sandpaper and wrapping it around a sanding block. You can also check out my standard process for How to Prep Painted Furniture.

Give the entire desk a good sanding. You don’t have to go crazy, but just enough to scuff the surface. Do this on all of the drawers.

Also, do this on the entire body of the desk. Basically, everywhere you intend to apply metallic paint.

Next, you will need to follow up with a good cleaning to remove any dirt, grime and/or dust. I like to use a scrubby sponge for this step because the scrubby side comes in handy if you need it.

Lastly, follow up with a clean rinse wipe down. Use a damp clean cloth aka paper towel to wipe down the desk to remove any last bits of dirt or cleaner.

During your prep and cleaning process, you may notice another area that is need or repair or attention. With this desk, that is exactly what happened.
Securing Loose Veneer on Drawers
Thankfully, this isn’t a huge problem, but it still needs to be addressed. The veneer on one of the drawers is a bit loose. Since it is not broken or damaged we simply need to resecure this. To do this we need to get a little wood glue into a tight space. This is where a wood glue syringe comes in handy. I get these online HERE.

Squeeze some of your wood glue into the syringe.

Squeeze out the air and you are all set.

Simply slide the syringe into the tiny space and fill with wood glue. There is little mess this way 😉

Any excess glue that comes out is easily wiped away with a damp cloth.

Make sure to clamp the drawer tightly until the wood glue is dry.

Click HERE to Pin this post for later.
Modern Masters Metallic Paint Collection Warm Primer
Now that all of the repairs, prep and random ‘fix its’ are taken care of we can FINALLY move on! We are going to go step by step through how to apply Modern Masters metallic paint. But before we apply our metallic furniture paint we are going to prime. Unlike other primers, this primer is part of Modern Masters Metallic paint collection and is specifically made to work with their metallic paints. That feels a bit like a tongue twister. 🙂

I love that this comes in a warm tone primer to work best under warm colors and is made to work with Modern Masters metallic paints. This takes the guesswork out of which primer to use. As you can see, the primer has a creaminess to it.

If you are new to furniture painting and want to learn how to update old furniture with paint you can always start at the beginning with How to Paint Furniture – a Beginners Guide.
Applying Modern Masters Primer
When applying the warm primer you will want to make sure to stir it well. Do not shake it. Then grab your favorite brush and make sure it’s clean. I often like to swap back and forth between Cling Ons and Zibra brushes. They both have soft bristles, are easy to work with and clean up well. (I abuse my brushes) To be honest, I like them both. Zibra brushes are a bit more affordable and can be ordered online (HERE). Cling Ons can be ordered online (HERE).

This time I am using my flat Cling On brush.

Apply the Modern Masters primer the same way you would apply any paint.

I like to apply in long thin brush strokes.

Make sure to apply your primer over the entire surface of the desk – anywhere you intend to apply metallic paint. For this desk, I apply two coats of primer making sure to lightly sand in between coats with a fine-grit sandpaper.

Don’t forget to wipe with a lint-free cloth after sanding to make sure you remove any possible dust. I keep a bucket of these in my shop and toss in the wash after use to use over and over. These are the ones that I use HERE.

Let your primer dry before we move on. *Note – it does dry rather quickly which is nice.

Painting Furniture with Modern Masters Metallic Paint – Copper Penny
We can finally move on to the fun part and begin painting our desk with Modern Masters Metallic paint in the color ‘Copper Penny’. The name is perfect for this shade of metallic copper paint. It truly suits it well. You can get this shiny copper paint online HERE.

Grab a clean brush and apply a thin coat of your metallic furniture paint to start.

Keep the first coat thin, but try to make sure the brush strokes are nice and straight.

I tend to get a little geeky when I work 😛

Painting Furniture with Modern Masters Metallic Paint – Antique Copper
While we wait for the first coat of metallic copper paint to dry on the drawers we can work on painting the body of the desk. We are painting the body in a darker metallic shade called Antique Copper. This is a deep rich shade of copper which works beautifully with the lighter copper penny on the drawers. This gorgeous shimmer paint can also be found online HERE.

Go ahead and paint the entire body of the desk in this rich copper paint.

Antique Copper is a semi-opaque metallic and will require more coats of paint then copper penny. This is one after one coat of metallic copper paint.

Once dry we are going to apply a second coat of the Antique Copper paint to the desk. Give the surface a quick light sanding and wipe with a lint-free cloth as always.

Next, go ahead and apply a second coat of Modern Masters metallic paint in Antique Copper.

The second coat is noticeably darker and richer than the first.

Though darker, the second coat is not as dark as I would like it just yet. I am going for a shade so dark that it almost resembles a bronze metallic paint, but is still in fact copper. I hope that makes sense.

How Many Coats of Metallic Paint
One thing to keep in mind is that each color will have a different level of opacity. Modern Masters Metallic Paint comes in Opaque, Semi-Opaque and Sheer.
- Opaque colors have excellent coverage – two coats are recommended for best results.
- Semi-Opaque colors have good coverage – three coats are recommended for best results.
- Sheer colors are translucent overcoats that create a subtle shimmer to paint finishes.
Antique Copper is considered semi-opaque while Copper Penny is an opaque metallic paint. I do think that any of the Modern Masters metallic paint colors can also be used as a metallic glaze by simply using less coats of paint if you choose to do so.
Click HERE to Pin this post for later

Moving on. While we allow the antique copper metallic paint to dry lets circle back to the drawers. We are applying our second coat of Copper Penny to the drawers and you can really see the shimmer.

Continue to paint additional coats of paint until you are in love with the shimmer and shine of your finish. For this desk, I am applying 3 coats of copper penny on the drawers and 4 coats of antique copper on the body. This creates the rich metallic color that I am aiming for.
Adding Stripes to Metallic Painted Furniture
For ad added wow factor, I am adding stripes to the drawers. If you have never added stripes to your painted furniture makeovers before I am going to show you the easiest method I know how to get this done perfectly.
Click HERE to Pin this post for later
Setting Up to Paint Stripes
This is where labeling your drawers comes in handy. On a flat surface, line up the drawers in the order that they would go in the desk and clamp them together. I am using extra-long clamps. You can find some like these online HERE.

Next, grab your painters tape. My favorite tapes are Scotch Platinum and Frog Tape. Carefully, lay your painters tape down vertically on your drawer fronts. Make sure to lay it straight all the way down and do not overlap.

Then peel away every other piece of tape. I know, I know. This may seem wasteful due to laying tape down and then peeling away. But, if this is the price to pay to avoid measuring and being able to keep my sanity I am all for it!

You will be left with perfectly spaced stripes!

We don’t want to paint these stripes with the drawers clamped together. So, grab an Exacto knife and carefully cut the tape between the drawers so you can separate them. I keep a supply of these with extra blades in my shop so that I always have a fresh blade. This is the one that I have HERE.

A fresh blade will ensure a crisp cut every time.

Once you do this for each and every drawer you will need to go back and press down your tape to make sure that there are no lifted spots or bubbles.

Now you can separate your drawers with confidence to move on to paint stripes with metallic paint.

Painting Stripes with Modern Masters Metallic Paint – Rose Gold
I confess that I have been secretly dying to paint something with Rose Gold metallic paint. This metallic pink paint is the perfect color for the stripes. Win-win.

Carefully apply thin coats of rose gold paint onto the drawers using a clean brush.

The subtle difference of the rose gold next to the copper penny is so pretty. I also try my best to paint from the tape and away rather than towards the tape. The main reason for this is that I don’t want to take any chance of pushing the tape up off of the drawer. By brushing away from the tape we make sure that our lines stay crisp.

To make sure that I have amazing coverage with the stripes I apply two coats of the rose gold metallic paint to the drawers.

As soon as you finish you can go ahead and peel away your painters tape. Personally, I prefer to remove the tape as soon as I finish rather than leave it for a period of time.

The reveal is always the best part.

Click HERE to Pin this post for later
I should also mention a few things:
- I did not apply any type of sealer to the copper penny before adding stripes
- the stripes come out crisp and perfect
- the copper penny did not lift or peel at all
- I actually made a little mistake. Can you see it?

Here is a closer look.

Yep, we need to paint that center trim to match the rest. haha. Simply tape it off and grab the antique copper metallic paint. Easy peasy.

Sealing Metallic Paint
It is finally time to seal our Modern Masters metallic painted desk. Before we apply our topcoat lets give a quick light sanding with a fine-grit sandpaper.

Next, make sure to wipe with the lint-free cloth again.

Don’t forget the drawers!

We are sealing our Modern Masters Paint with their satin Master Clear topcoat. This topcoat is also part of the Modern Masters Metallic Paint collection and is made to go over their metallic paint to protect while maintaining shimmer. It’s available online HERE.

Just like before, give the sealer a stir, but do not shake. Then grab whatever it is you prefer to use for applying a topcoat. My all-time favorite way of sealing painted furniture is to use my yellow applicator sponge. You can get these online HERE. They do tend to go in and out of stock, so when they are in stock I grab a few.

I like to scoop or pour some topcoat onto a paper plate and work from there. Simply dab your sponge onto the plate, wipe the excess off on the side and apply your sealer to your metallic painted desk.

Do the same on all of the drawers.

To prevent any excess sealer from pooling in crevices or creases all you need to do is wipe it away with a clean, dry chip brush.

How to Paint Metal Hardware with Modern Masters Paint
Let’s not forget the hardware. Our wooden desk is pretty with shimmer and stripes so we need to update the hardware to match.

Make sure to give your hardware a good cleaning and prep before we apply any paint. This is my standard method for how to clean and prep hardware for paint. Once your hardware is clean and ready we are going to follow the same steps as with the desk itself. But one cool thing is we can tint the primer! Since the hardware is so dark and we are painting it antique copper to match the desk I am tinting the primer with a little bit of the antique copper metallic paint.

One coat of tinted primer before applying the metallic copper paint makes the coverage amazing!

Guess what? We can do the same thing with the topcoat. I add just a tiny bit of the metallic paint to the clear sealer before applying the final coat of sealer to the hardware.

The hardware looks fantastic on the striped drawers!

Now that the project is sealed and finished you can put all of the drawers back into your desk. You do have a few options when it comes to the insides of the drawers. You can do one of a few things:
- leave the insides of the drawers as is if the condition is good
- you can add drawers liners to your painted furniture
- paint the inside of the drawers to match or complement the outside
- you can freshen up your wooden drawers with furniture salve
Whatever you decide to do is personal preference. For this desk, I am leaving the inside of the drawers ‘as-is’.
Click HERE to Pin this post for later
Video Tutorial for How to Paint Furniture with Modern Masters Metallic Collection Paint
You can follow the project via video here. (It’s approximately 35 min long) If you are unable to see the video you may need to turn off ‘ad-blockers’ on your site. The video may also autoplay within the tutorial post.
Painted Wooden Desk With Copper Shimmer and Rose Gold Stripes
Your desk is all finished. This project, like many of my makeovers, is being donated to a local school, animal rescue or charity to help with their fundraising efforts. Click here to see all of my projects that have been donated to support local fundraisers, schools, and charities: Donation Projects.

Check out all of my furniture projects with over 90 painted furniture makeovers: Stunning painted furniture ideas.


You can get find all of these Modern Masters Metallic paint colors, products and more online here: Modern Masters.

Furniture Fixer-Uppers
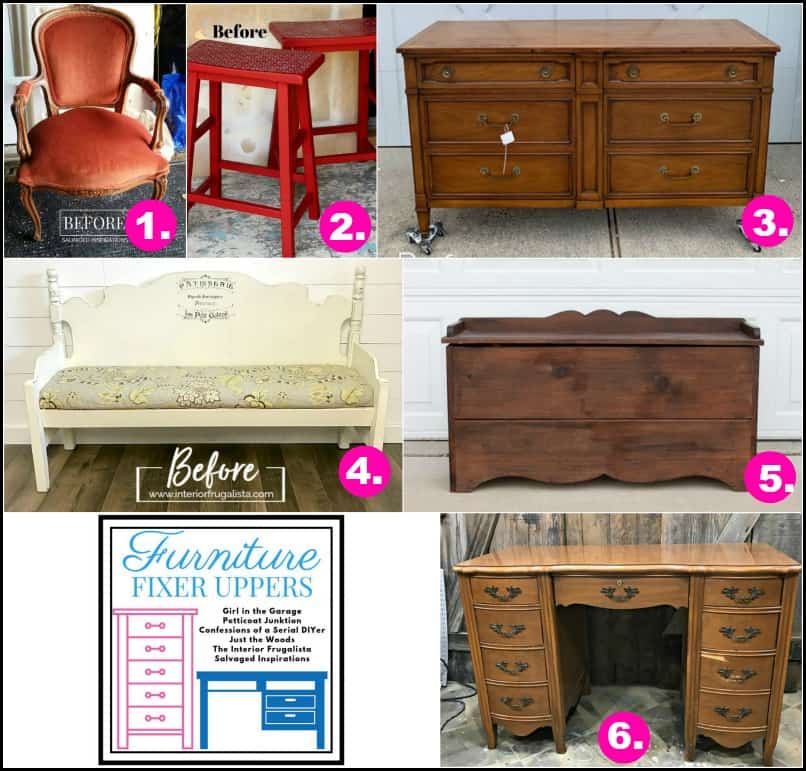
Its that time again where a few of my creative and talented blogger friends and I have joined together in our monthly Furniture Fixer Uppers share. Let’s see what my friends are up to! Make sure to click the links below the image to check out all the amazing projects that my bloggy girls are working on this month.
3. Confessions of a Serial DIYer
6. Just the Woods (you are here)

Don’t Forget – Follow Just the Woods and Share this post to Inspire others:

FACEBOOK * INSTAGRAM * PINTEREST
Stay connected! For more tips and tricks sign up here : [mc4wp_form id=”1340″]

Click HERE to Pin this post for later


Thanks for such great directions, I learned a lot from your tutorial.
thank you so much Susan xoxo
Hi Kandice! What a pretty desk. I am not a big fan of the Metallic paints but this is a pretty color. Thank you for the tutorial. I did order the glue injectors and sandpaper you used. All of your tips and tricks are much appreciated.
thanks so much Cheryl! Those glue syringes are a game changer! 🙂
Oh my word, Kandice, this is stunning! Love the copper tones and those rose gold stripes are mahvelous dahling. Whichever charity is the lucky recipient of this desk is going to be thrilled because they should get some decent coin for this desk.
Thank you Marie! The desk will be donated to my kids’ school to raffle off at their Christmas fair. 🙂
I’m just gobsmacked at how beautiful this dresser turned out with the metallic paint! I adore the pink with the copper. Those little bottles of paint look too tiny to have painted that entire dresser with so many coats of paint. Was there really enough paint or did you use 4 bottles? I have a wooden jewelry box that I am going to redo for my granddaughter and I think I may do it in these colors. Thanks for sharing!
thank you! I was actually worried that I wouldn’t have enough paint too. But I was amazed at how far it went. The antique copper used 2 small containers. Each coat used about 1/2 the container. The other colors didn’t even use half of the container of paint! Crazy right?
Kandice, this turned out so pretty and elegant. I would not have imagined those colors together before but they really do look beautiful. Modern Masters has the best metallic paints!
Wow. That is a lot of work. I was tired just watching!
lol . thanks for watching Phyllis 🙂
Hey Kan Kan….great job on this desk. I’m pinning it to my metallics paint Hall of Fame. XOXO
This is so beautiful, Kandice!! It’s a one-of-a-kind masterpiece now! XOXO
Wow! As always, your makeover is stunning! Feel free to donate any of your projects to me! I’m not a charity but will be more than happy to take anything off your hands! ????
Terrific tutorial for Modern Masters. Thank You!
Enjoying your transformation. The desk is beautiful.
Wow…just found your site…the desk came out stunning. I have a very similar desk that has taken a beating…I might have to order all of this stuff!! We have downsized from a big house to a condo…which makes painting furniture a bit of a challenge but I think I have to go for it! Do you think it would look too boring if the drawers were the same color as desk? Can’t wait to go through your blog.
I dont think it will be boring at all. I almost left the drawers without stripes 🙂