How to Make the Best DIY Coasters with Gold Leaf. Create a unique gift with decoupaged wood coasters and gold leaf trim for the best DIY coasters to gift (or keep)
DIY Coasters with Gold Leaf

Once you know how to make DIY coasters you will always have an easy gift idea at your fingertips. These DIY coasters are not only easy to make but they also make a great gift. These are the perfect hostess gift or even a teacher gift. Since we have numerous pieces of painted furniture in our home, we have at least 3 sets of coasters in our home because my family members tend to leave their drink glasses everywhere. The best thing about making your own handmade coasters is that you can make them completely different each time, making them totally unique. Have you ever considered making your own DIY coasters with decoupage and gold leaf?
Disclosure: This post contains affiliate links for your convenience. Click here for my full disclosure policy.
How to Make DIY Coasters
You can find many of these items at your local Home Depot or hardware store. Otherwise craft stores, or online is your best bet.
Materials Needed / Source List:
- Wooden Unfinished Coasters (I used these)
- Decoupage Tissue
- Liquid Gold Leaf
- Sanding Block
- Mod Podge
- Silicone Glue Brush
- Small Paintbrush
- Dixie Belle Paint Company
DIY Coaster Supplies

This simple project only requires a few simple supplies. The hardest part may be choosing your decoupage tissue for your coasters. If you love decoupage projects then you may find this Decoupage Supplies post helpful. But if you are just looking for decoupage tissue then you can find a wide variety (here) or decoupage napkins found (here).

One nice thing about these unfinished wooden coasters is that they come with the safety rubber nubs on the bottom to prevent any scratches on your furniture. If you are working with coasters that are unfinished underneath (or with ceramic tiles) then you can easily add felt pads or felt squares to your DIY coasters to protect your furniture. You can find felt with adhesive backing (here)
Adding Decoupage to Wooden Coasters
Now that you have your unfinished coasters and your decoupage print picked out let’s grab our Mod Podge. If you don’t often use Mod Podge, just know that a little goes a long way.


Using the handy little silicone glue brush apply a thin layer of Mod Podge to your wooden coaster. If you need a glue brush you can find them (here). If you have a foam brush that works too.

Next, place your decoupage tissue onto the wood coaster and smooth it out with plastic wrap to remove any bubbles.

To get a clean edge on your DIY coaster go ahead and remove the excess tissue with a sanding block.

By sanding in a downward motion you ‘tear’ the tissue from the coaster leaving a clean edge.

Repeat this same process for all of your DIY coasters. Decoupage is a fun way to add a unique design to the top of the coaster.
Keep in mind that if you are using a see-through tissue or paper you may want to grab a paint brush and apply a single coat of acrylic paint or craft paint to the coaster first to act as a base behind the paper. White paint is often a great way to give the coasters a nice solid base. We don’t have that issue with this paper, but I still want to mention it in case you do.
Adding Gold Leaf to DIY Coasters

Now that you have applied your decoupage to your DIY coasters it’s time to add a little glam to the sides of the coaster. Since the arrow pattern features a few metallic gold arrows I am adding metallic gold leaf paint to these wood slice coasters edge. .

Using a small paintbrush carefully paint the sides of the DIY coasters. Because the wood slices are raw and unsealed the liquid gold leaf will absorb into the wood. You also won’t notice any visible brush strokes because of this.

Once dry, the gold leaf adds a gorgeous unique touch to your DIY wood coasters.
Seal Your Handmade Coasters

You want to make sure to seal your handmade coasters. Go ahead and add one or two coats of Mod Podge over your tissue.
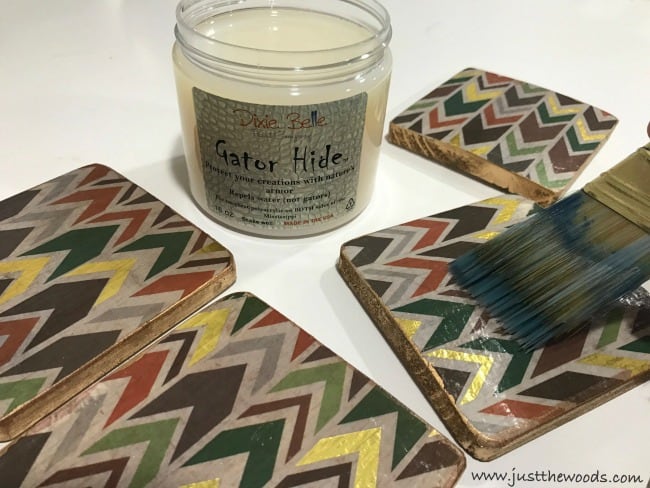
Once the Mod Podge is completely dry you can seal the handmade coasters with a clear coat sealer. I’m sealing with Gator Hide by Dixie Belle because it is a clear sealer that also repels water. This is important when using this as DIY drink coasters. You can get Gator Hide (here)
Handmade DIY Coasters with Gold Leaf
Once dry your handmade DIY coasters make the perfect gift, or you may want to keep these cute coasters for yourself!


These easy DIY coasters are the perfect craft project to do for the holiday season because you can design them in different ways, and gift them to each family member. The final product is a simple perfect coasters.
If you like this then make sure to check out all the other projects using metallic paint: Metallic Makeovers Or if you love the idea of homemade coasters but prefer not to do the work? You can find a wide variety of unique handmade coasters online (here)


Second Version of DIY Coasters

These DIY coasters can also be made using the same process but you can use tile instead of wood. For example, these homemade tile coasters are made with travertine tiles and decoupaged napkin.
I’ll be sharing this post at these fabulous link parties.
Don’t Forget – Follow Just the Woods and Share this post to Inspire others:
FACEBOOK * INSTAGRAM * PINTEREST
Stay connected! For more tips and tricks sign up here : [mc4wp_form id=”1340″]
Pin it!


Leave a Reply