How to Make a Stenciled DIY Address Sign
Have you considered a personalized address sign for your home? Today I’m sharing another easy DIY project. This stenciled address sign is for our cabin in the Catskills. I shared a bit about the cabin in my DIY No-Sew Curtains post. A quick overview; the cabin is exactly that: a cabin. No frills, nothing fancy, wood walls, wood floors and even wood ceilings. It’s where we go to take a break from the hustle and bustle of the city. We rent the cabin out seasonally to people from all over who seek a little nature and peace and quiet.
Disclosure: This post contains affiliate links for your convenience. Click here for my full disclosure policy.

How to Make a Stenciled Address Sign
Materials Needed / Source List
- Scrap piece of Wood
- House Numbers (I used the reflective kind)
- Spray Adhesive
- Foam Pouncers
- Cricut Machine (I have the Explore Air)
The Rustic Cabin in the Woods
The cabin sits on a dark road up on the mountain and you can drive right past it if not paying attention.

For as long as I could remember we had simple metal numbers hammered into the tree with a red reflector. I don’t think it could get more basic than that. It needs something better.

Making a DIY House Number Sign
The first thing to do is find a piece of scrap wood, or get a plain wooden board. I recently built a new table top for a previous project and had this scrap wood leftover. Also, choose your house numbers if you plan to use pre-made ones. You could also stencil the numbers if you’d like.

Cut the wood to size and sand the edges smooth. Luckily, I had cut this piece to size at the same time as cutting the previous table top. Since I had all the tools out I also used the router to cut a decorative edge. The decorative edge is not necessary unless you choose to do so.

Stain your wooden address plaque using your stain of choice. You can find great quality furniture paint and stain online HERE. An added bonus, when painting furniture, you want to make sure to use a quality non-toxic furniture paint.

After three coats of wood stain its time to create the customized stencil. Place the address numbers on the plaque and measure the empty space. Use this measurement as a guide for your stencil.


Creating a House Number Stencil with Cricut
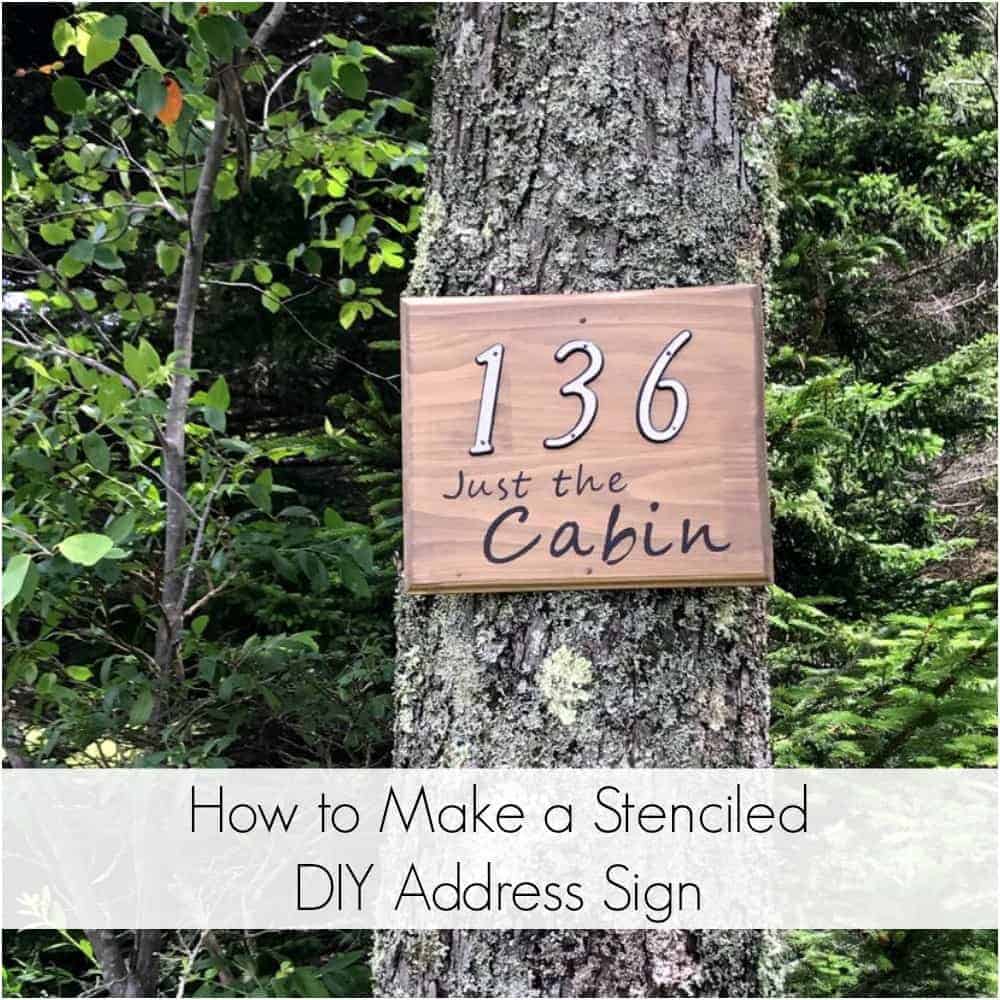
We actually call the cabin “Just the Cabin”. The name for the cabin comes from my son who also named my business Just the Woods when he was 3 years old. Rather than include the street name on the address sign I chose to use the cabin’s name. Our renters also know it as “Just the Cabin”. This can easily be done with the Cricut Explore Air. Check out more stenciled projects by clicking here: STENCIL

Once the font and letters are correct, cut out your stencil. I used the cardstock for this stencil.

Remove the letters and place the stencil on the wood to find proper placement.

To make sure that the stencil is centered measure the outer sides. Check the spacing from the end of the first and last letter to the outer edge.

Once satisfied with placement, spray the back of the stencil with adhesive spray. Place the stencil on the board to keep it in place while you apply paint.

Stenciling Custom Wooden Sign
For the painted portion of the stencil grab a foam pouncer, paint, and paper plate. I prefer to put a bit of paint on the paper plate and work from there.

Since the wood is a rustic brown I’m using a true black paint for the stencil. Apply the paint with the foam pouncer onto your stencil.

Once completely painted you can peel off your cardstock stencil. The centers of the letters may remain on the wooden address plaque.

Gently lift and remove the centers with an Exacto knife.

For a more detailed tutorial on adding stencils to your painted furniture makeovers make sure to check out How to Stencil Painted Furniture. There’s even a video included in the post. 
Adding House Numbers to the DIY Address Sign
Grab those house numbers and lay them on your stenciled sign how you would like them to appear. Use a ruler to check spacing and make sure they are straight and level. Satisfied? Go ahead and nail them in!

Since this will be hammered into a tree it needs a starter hole. I don’t want to risk the wood splitting when nailing it up. Grab a drill and drill bits. A small hole should suffice.

Drill a small hole in the upper center area of your address sign and you’re all set.

The stenciled address sign is packed and ready to head upstate to the cabin.

Adding Rustic Address Sign to a Tree
The new wooden sign is perfect for a rustic cabin and the reflective numbers will be perfect when arriving late at night. 
The pre-drilled hole makes hammering the sign a breeze.

A Rustic Stenciled DIY Address Sign
Goodbye old metal numbers and hello DIY rustic stenciled address sign. Welcome to Just the Cabin!


Are you ready to get creative and make your own DIY stenciled address sign?
 If you love simple DIY projects then make sure to check out Super Easy No-Sew Curtains.
 Feeling creative and impatient? Looking for pre-made stencils? When I’m not ready to make my own or I want something a bit more busy I order online here: Ready made stencils.
I’ll be sharing this post at these fabulous link parties.
Don’t Forget – Follow Just the Woods and Share this post to Inspire others:
FACEBOOK * INSTAGRAM * PINTEREST

[mc4wp_form id=”1340″]
PINTEREST PIN READY TO SHARE
7 Comments