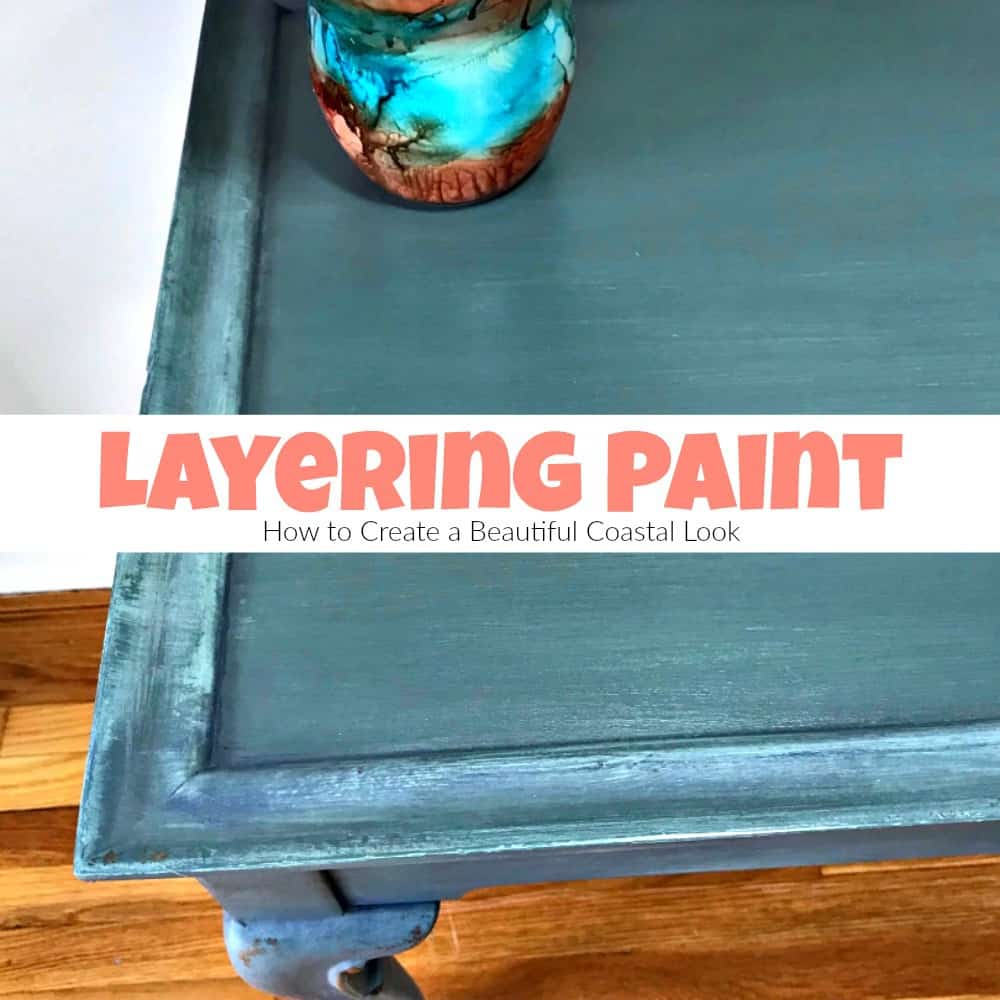
Layering Paint: How to Create a Beautiful Coastal Look
If you love painting furniture but feel unsure about how to layer paint to achieve that layered paint finish, don’t be. Layering paint on your painted furniture makeover is so fun and always results in something different. Today I’m sharing a tea table makeover with you that is hand painted in a coastal style with painted layers of blues and grays. This tea table is super unique with hideaway pullouts on each side. I’ve decided to jump on the opportunity to use these pull out drawers to add a pop of color.

Disclosure: This layering paint blue painted table makeover post contains affiliate links for your convenience. Click here for my full disclosure policy.

Supplies & Tools Needed to Paint a Coastal Table
What You Will Need
Tools
- Daddy Van’s Furniture Polish
- Orbital Sander
- Plastic Spoons
- Paintbrushes
- Scotch Blue Platinum Tape
- Sandpaper
- Old T-shirt or rag
- Furniture Tri- Dollies
Paint
Unfinished Vintage Tea Table
This vintage tea table started with a few scratches, strange discoloration on top and minor flaws, but for the most part in pretty nice condition. The table is all wood which is always a nice thing! The pretty little table feet fit perfectly on my tri-dollies. These make it easy to move your piece around while you work on it, you can get them online HERE.

As you can see, the sides pull out.

The two pull outs are actually held in by a simple screw underneath so before getting started you have to remove the screw and remove the drawers. Let’s flip the table over and do that before we start layering paint on this beauty.

Grab a screwdriver and remove the screw from underneath both slides. Im not sure if I should call these pullouts, slides, or drawers. But you get the idea, either way 😉

Pull out those wooden slides and set them aside. Make sure to keep the screw in a safe place, since we will be putting this back together after we finish the painted layers.

Prepping a Tea Table for Paint
Now we can continue on and prep our wood table for paint. This is my full process for ‘How to Prep Painted Furniture‘. But if you want the short version, I lightly scuff the legs with sandpaper and use my orbital sander on the table top. My shop is in the basement of my home, so yes, I use an electric sander indoors. I first learned this little trick when sanding the wood floor inside my master bedroom during our small closet renovation. But you can see how its done along with a whole bunch of other tips and tricks here: Secrets and Tips for Painting Furniture.

After you sand the entire table: legs, top and pull outs make sure to wipe it clean and remove all dust.

Click here to Pin this post for later.
If you are new to furniture painting and want to learn how to update old furniture with paint you can always start at the beginning with How to Paint Furniture – a Beginners Guide.
Layering Paint on a Vintage Tea Table
Since this table is being donated to a local fundraiser I get full creative freedom with how to paint. This is a win-win as far as I’m concerned. I also love layering paint on furniture because each time the end result is different. I’m going for a coastal style blues and grays on the outside with a pop of coral for the drawers. Fun right? I start with these pretty colors from Dixie Belle Paint.

If you love these colors you can get them online here: Dixie Belle Paint

Since I don’t have an exact plan with my painted layers process, I am starting with stormy seas, which is a deep gray. You can find another project painted in all stormy seas here: Painted and Stenciled Desk Makeover.

The entire tea table is painted in stormy seas using one of my soft bristle Zibra brushes. You can get these white soft bristle brushes online HERE.

After stormy seas, I begin layering paint by brushing sea glass over the table. The sea glass is applied in less than full coverage but more than dry brushing as you can see. Have fun with it and don’t worry how it looks right now. Sometimes painting layers can go through a scary or ugly phase before it becomes beautiful.

Next, get a water spritzer and apply yankee blue to the tea table. Focus on the creases and spritz with a little water.

Click here to Pin this post for later.
Now that the paint is slightly diluted and wetter than normal you can easily drag and spread the paint over the table surface. Working with the diluted paint helps create that layered paint finish that we are going for.

Using a clean rag or old T-shirt wipe away the wet paint before it dries. We are somewhere between a coastal feel and maybe even a little denim. The fun part about layering paint is that you really can’t be certain how the end result will look, so you ‘play’ until you love it.

Addressing the Table Top
I admit that I love the look on the table legs and skirt, but not the table top. This is just personal preference. So as an added step tape off the table top. I love the scotch blue platinum tape because it tears at perfect 90-degree angles. You can get some online HERE.

Using an old raggedy brush I’m lightly brushing a little bit of stormy seas back over the table top center area. To do this, get a clean, dry, old paintbrush.

When using the dry brush technique to layer paint you want to dip the tip of the brush in your paint. Make sure not to saturate the brush with paint.

Click here to Pin this post for later.
Dab off the excess paint onto a paper towel leaving your brush almost dry with very little paint actually on it.

Very lightly brush over the tea table top. For a more detailed tutorial on the dry brushing technique, you can find it here: how to dry brush furniture.

Distressing Your Coastal Painted Table
Once satisfied with your painted table let’s distress those edges and bring out the details. I’m using a fine grit sandpaper to distress the edges and raised details on the table. The blue painted layers along with the seashell give this table a real coastal vibe.

You can also lightly sand the entire surface of your blue painted table to get a super smooth finish. I like to do this with all of my painted furniture makeovers.

Click here to Pin this post for later.
Sealing your Painted Table
Always make sure to seal your painted furniture makeovers. I’m using Dixie Belles satin clear coat to seal this coastal painted table.

To seal your painted table grab your clear sealer and an applicator sponge. The sponge is the easiest way to apply sealer without streaks or brushstrokes. You can get these handy dandy applicator sponges online HERE.

If you have questions about sealing your painted furniture project you can find a full tutorial with video on how to apply clear sealer here: Sealing Painted Furniture

As an added precaution the table top is also sealed with an additional coat of Gator-Hide. Gator Hide is a water repellant sealer that is applied in the same way as the clear satin. You can get Gator Hide online HERE.

Protecting the Pull Outs
Remember that pop of color I mentioned? Those pull outs are painted in Flamingo which is a bold and pretty coral.

Anytime you have wooden drawers that may rub against wood you will want to lubricate them. This works for sticking drawers as well. I find that Daddy Van’s furniture polish is the best product for this. It’s all natural and smells great. You can get some online HERE. If you don’t have any Daddy Van’s you can also use Wise Old furniture salve, which is another favorite of mine. You can find that here: Wise Owl.

Simply add a little furniture polish to a paper towel.

Then rub on the edges or anywhere that wood would rub against wood. Easy peasy.

Layering Paint for a Coastal Painted Table Makeover
Your painted table makeover is complete. This painted table was donated to a local school and raffled off to help with their fundraising. Click here to see all of my projects that have been donated to support local fundraisers, schools, and charities: Donation Projects.

Check out all of my furniture projects with over 90 painted furniture makeovers: Stunning painted furniture ideas.

Click here to Pin this post for later.


I’d love for you to join me for more painted furniture makeovers, and DIY projects! and Share this post to Inspire others:

FACEBOOK * INSTAGRAM * PINTEREST
Stay connected! For more tips and tricks sign up here : [mc4wp_form id=”1340″]


How long do you let dry between layering the coats? And when you added the darker blue with water spritzer, did you coat the entire table or just the crevices?
I just waited until the paint was dry, which didn’t take long at all. Normally by the time I finished one layer, I could start the next layer back where I started since the paint was dry by then. I hope that makes sense. As far as the darker color, I focused on the crevices but did drag the wet paint all over most of the surface before wiping away.
I love the colours you chose and the pop of coral is so fun!
I love how this table turned out! Your layering looks so good! Beautiful!!!