Dry Brushing Furniture Tutorial with Video
Dry brushing furniture. Dry brushing is the easiest furniture painting technique. Get that gorgeous dry brushed painted furniture finish.
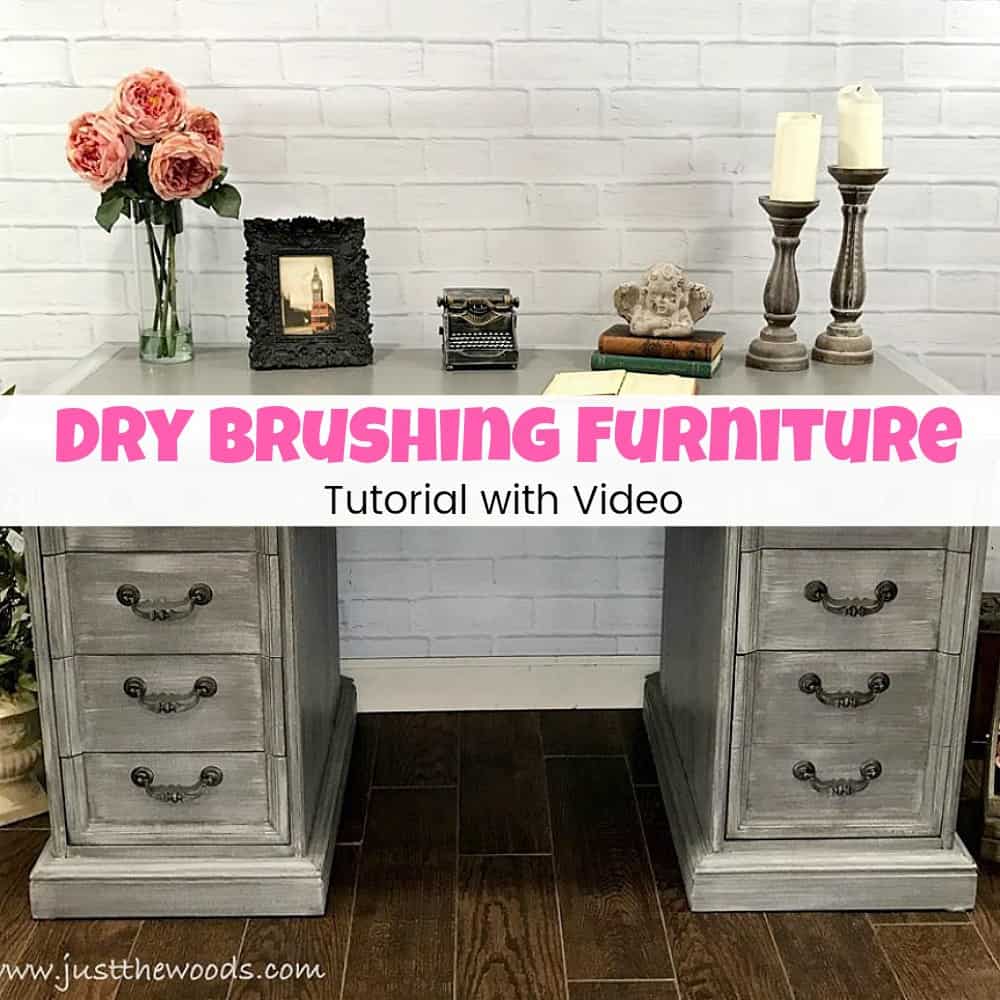
Dry Brushing Technique on a Painted Desk
Are you a fan of the dry brush paint technique? If you are unsure of what I mean, you may wonder what does it mean to dry brush or how do you dry brush? Well, dry brushing is a technique used when painting furniture with an almost completely dry paintbrush. If you’d like to learn more about the dry brush technique then keep on reading.

Disclosure: This dry brush painting technique post contains affiliate links for your convenience. Click here for my full disclosure policy.
How to Dry Brush Paint
Materials Needed / Source List:
- Chip Brush
- Yellow Detailer Sponge
- Flexible Sandpaper
- Sandpaper
- Shop-Vac
- Rolgear Screwdriver
- Scotch Blue Platinum Tape
- Daddy Vans Furniture Polish
- Lint Free Cloth
- Find all of my favorite tools and products on my Amazon Page here.
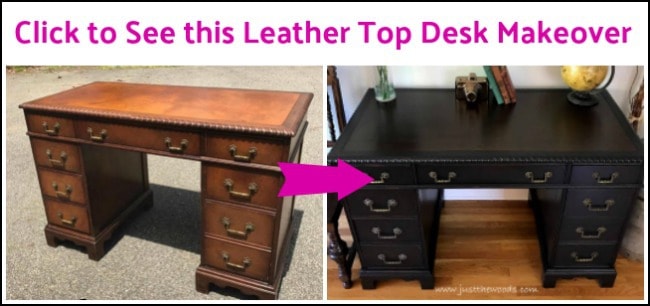
A Vintage Leather Top Executive Desk
This vintage desk like most older pieces of furniture has a story. In its previous life, it belonged to the Dean of Students from a local college who recently passed away. After the makeover, it will belong to a young educator who seems to be the perfect person to own it for the next however many years. Like most desks, this vintage desk comes with an abundance of drawers as well as a double drawer. Also, like most vintage furniture, it’s well made but shows some age and wear that comes with time. It was a beautiful piece of furniture before and it will be again.

Preparing the Vintage Desk for Paint
The desk is fully cleaned and prepped how I always Prep Painted Furniture. Hardware is removed. Lately, I always grab my Rolgear screwdriver before any others. It’s a ratcheting screwdriver that comes with multiple extensions, which makes things just a little bit easier. You can get one (here)

Drawers are vacuumed with the shop vac.

Drawers are labeled underneath with chalk to ensure that they go back where they came from. This is just one of the many tips I share in Tips & Secrets for Painting Furniture.

Even the leather inlay is sanded and cleaned.

Painting Leather Inlay on a Vintage Desk
This is not the first time I’m painting leather. You can check out other projects where the leather is saved here: Leather Top Desk and here: Paint the Leather Tables. Once sanded and cleaned the entire desk including the drawers, inside and out, and the leather inlay is painted a pretty gray. This is the base coat of paint for the entire desk. For best results, you should use the best paints. You can find great color options and quality furniture chalk paint online HERE.

Paint two coats of paint on the leather making sure to lightly sand in between each coat. Next, apply a clear sealer with the yellow detailer sponge. This sponge is an easy way and great way to apply sealer. It’s my my all-time favorite for applying sealer, you can get one (here).

Here is a full tutorial with VIDEO showing how I seal my painted furniture projects: Sealing Painted Furniture

Now that the top is done it’s on to the next step, the fun part: dry brush painting!
Dry Brush Technique on Painted Furniture
The most important thing to remember when dry brushing furniture is to use an almost dry brush and very little paint. I find that the best paintbrush to use to dry brush is a plain chip brush. You do not need to use the best brushes when you are dry brush painting furniture.

You also do not want to use too much paint. Pour a little paint onto a paper plate. Dip your chip brush into your paint very lightly, only getting paint on the tips. Then wipe the excess paint off of the paint brush onto a dry paper towel.

Next, lightly drag your chip brush over your painted surface using a very light pressure. The tip of the brush should glide across the desk like a feather. If you use too much paint or too much pressure your paint could become globbed and too thick. This is a great technique but may require a little practice.

Here is a short video tutorial showing how to dry brush paint onto your furniture. The video isn’t fancy, but at least I can explain the dry brush technique a bit more in detail while showing an example of how lightly to paint your dry brushed layers.
Dry Brushing Paint on Corners
Tape the center portion of the desk with Scotch Blue Platinum tape to avoid dry brushing paint onto the leather portion of the desktop. The Platinum tape works best because it tears at perfect 90-degree angles. You can get your own (here). If you have ever painted furniture using the dry brush technique before it’s possible that you may run into the issue of overlapping brush strokes at the corners. There is a simple way to avoid this! To avoid overlapping strokes simply block off half of the corner in the direction of the angled seam using a piece of paper or cardboard.

By blocking at the angle of the wood you can now dry brush with professional-looking painted corners.

Do the same on the opposite side to allow the paint to meet in the middle creating the appearance of a seam.

After dry brushing multiple layers, your end result will look more natural.

Click here to Pin this post for later.
Adding a Wash to Dry Brushed Furniture
After layering your dry brushed paint you will want to create a wash to apply over the entire desk (minus the leather top). An extremely diluted coat of very light gray paint is applied and then immediately wiped away using a clean cloth aka an old T-shirt. You can find a more detailed tutorial on how to whitewash furniture.

How Many Layers?
When dry brush painting, each layer uses a minimal amount of paint. The layers will often alternate between light colors and a darker color to create a nice balance of dry-brushing layers. The order of dry brushed painted layers / paint colors on this desk is as follows:
- Base color- gray
- Dry brush
- off-white paint
- dark gray
- light gray
- Wash – very light gray
- Sealed – gray tinted sealer
Painting Vintage Hardware
You can often reuse the hardware with a painted piece of furniture. It just needs some cleaning and a bit of paint. The original vintage hardware suits the desk perfectly, so it’s cleaned up for paint. Here is my process for How to Clean, Prep & Paint Hardware.

Now that the hardware is cleaned, paint it first using gray paint. You can use the same kind of paint on the hardware as the desk. This is the same gray that we used as a base for the desk.

Next, paint the hardware in a mix of dark and light metallic silver paint.

This combo makes the perfect metallic dark silver paint for the hardware.

It makes a not-so-great nail polish color. Oops.

Sealing Dry Brushed Furniture with Glaze
Lastly, make sure to seal your dry brushed painted furniture. If you have questions about sealing your painted furniture project you can find a full tutorial with a video on how to apply clear sealer here: Sealing Painted Furniture
Click here to Pin this post for later
Putting Your Work Back Together
I’ve mentioned before how old wooden furniture can possibly stick. To prevent the sticking drawers I always grab my ever trusty Daddy Vans all-natural furniture polish. Find it (here)

Using an old rag or T-shirt rub the drawer tracks Daddy Vans.

Also, rub the bottom of the drawers and any area where wood would rub against wood. This will allow for the drawers to slide and glide with ease.

Gorgeous Dry Brushed Painted Furniture Finish
Now that we’ve finished dry brushing our painted furniture this vintage desk is ready to head to its new home.

Check out all of my furniture projects with over 90 painted furniture makeovers: Stunning painted furniture ideas.

Click here to Pin this post for later

Looking for an executive desk, but prefer not to DIY? There are a wide variety of desks for sale available and able to ship to your doorstep (here)


Wait! Don’t Go! It’s that time of the month again for:
Furniture Fixer-Uppers
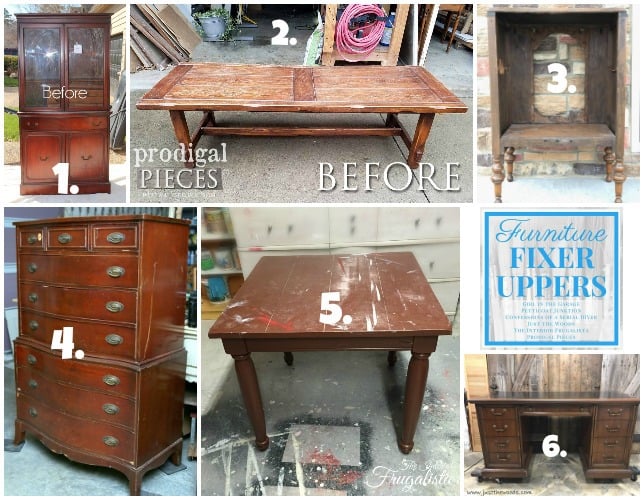
A few of my creative and talented blogger friends and I have joined together in our monthly Furniture Fixer Uppers share. Some of this month’s projects are new and some are resharing their best of the year. Let’s see what my friends are up to! Make sure to click the links below the image to check out all the amazing projects that my bloggy girls are working on this month.
- Confessions of a Serial DIYer
- Prodigal Pieces
- Girl in the Garage
- Petticoat Junktion
- Interior Frugalista
- Just the Woods (you are here)

Don’t Forget – Follow Just the Woods and Share this post to Inspire others:
FACEBOOK * INSTAGRAM * PINTEREST


What a fabulous transformation, Kandice. It looks so much softer and would fit in any decor. Thank you for the tips!
This desk has such a beautiful finish now! XOXO
I love how that one turned out, Kandice! Thanks for the tip on waxing the drawers, too.
thank you so much
First, the desk makeover is gorgeous, Kandice! This post is loaded with great tips and the trick for not overlapping the brush strokes at the corners is brilliant!
I like the colors you chose for this painting project.
It seem these 2 colors are be-coming more popular recently Which is makes me want to try this combination using the dry brush technique. I think you have explained your how to do very well. Good Job , I have been using this technique for about 5 years now , you can get some amazing effects pending on your loading of the brush.
Anyway Love your Tutorial on this Technique nice work and great creativity too.
Greg HIll
thanks so much Greg 🙂
Thanks again! I want to dry brush over my base color. You explain it so well.
Ciao che bellisima lavoro
LOVE this, Kandice. Thanks for posting. My question is how do you not lose dry brush strokes when you put on your finish/wash/wax? I can get some gorgoeus drybrushing on raised areas but when I go to wax it really flattens it out or removes detail. Do you know what I mean? Perhaps I should spay fix it somehow prior to waxing? Any ideas?
hey Rita! I actually seal with wax so I can’t really answer that. I seal with a clear sealer and it doesn’t change the look of the dry brushing at all. xoxo
Kandice, thanks for breaking down all the layers of dry brushing & glaze for that perfect look! Love the color of the hardware too! Question: how do u apply sealer & glaze evenly w that sponge applicator? Could u do a video on that, pls?
I am definitely going to do a video soon for applying the sealer with the sponge. I have actually had a few inquiries for it. I promise its on my to-do list 🙂
Do you know of a way to preserve / revive / protect a black leather inlay on a desk? The leather inlay on my office desk is scratching easily and I’d like to protect it. Thanks!
I use a computer pad on mine. This is my desk that I preserved the leather and use a pad to protect it further. –> https://www.justthewoods.com/save-leather-top-vintage-desk/
Can I dry brush over stained furniture that hasn’t been painted? I have a bedroom set that is stained cherry. I would like to lighten it up some but without painting and losing the cherry undertones.
I don’t see why not BUT I would do a small test first on either the back, or a sample board. You want to make sure that the cherry stain doesn’t bleed when you add the paint. That could be very bad. Good luck
Thank you for this amazing post. I followed you instructions exactly as you described and my piece came out looking precisely as yours did. For the first time I am extremely ptoud of my work. It’s the most beautiful and professional looking piece I have ever painted!