Custom Angelic Blue Painted Sideboard
Custom Angelic Blue Painted Sideboard
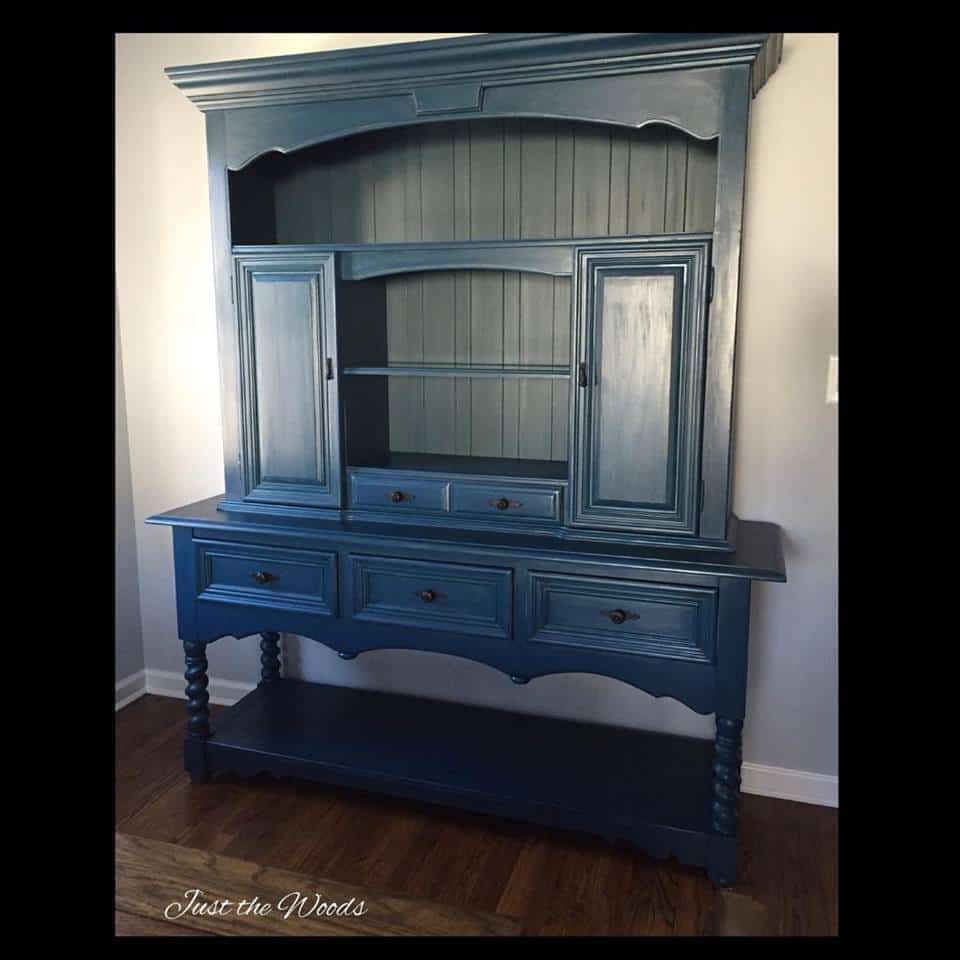
Can we just start with how amazing the details are in this Thomasville painted sideboard and the amazing story behind it?
The Back Story – my furniture angel
His name was Doug and he saved me and my aching back. I made arrangements via text with someone, a random phone number really to purchase a large sideboard/ buffet/ server/ hutch. I had no idea who I was communicating with but they told me that I would be meeting up with their friend Doug at the location. When I arrived Doug pulled up in his leather jacket, shaved head, and beard. He looked like he should’ve jumped off a Harley. We chatted as I examined the buffet and as he helped me load it into my truck I jokingly said that I need to take him with me to unload since it’s so heavy. Without a second thought, Doug asked where I was heading and offered to come with me to help me unload. I told him that I was only joking but I wholeheartedly appreciated and accepted his offer. Once the piece was loaded and tied down Doug jumped into the passenger seat of my truck and accompanied me to my storage unit. Once there he helped me shuffle some items inside, load the new piece in and take others out. He was so patient, waiting while I snapped a quick photo and then we left. He had me drop him off nearby and wouldn’t accept anything more than the price of the piece itself. I would never recommend letting strangers jump in your vehicle but it worked for me and Doug was my furniture angel that day.

Look at all that storage! The Prep – Repair
From afar this giant beauty is amazing, which it is, BUT it is not without flaws. There was so much repair work involved with the prep of this piece. I spent over four hours alone just doing repairs and cleaning. Here is probably the worst of it.. a deep gouge that required a serious patching. I often wonder what happened to a piece of furniture in its previous life to create such damage.
I patched and sanded and patched and sanded this gouge. With any old furniture makeover, it isn’t perfect but it is a major improvement. This repair was done using Bondo. I share more about using Bondo to repair furniture in my Tips and Secrets for Painting Furniture. 
The Prep – Cleaning
Disclosure: This custom blue painted sideboard post contains affiliate links for your convenience.
In addition to the repairs, I also had to give this beast a major cleaning. I sand the entire piece down with standard sandpaper and then clean with a sponge, water, vinegar, and soap. I snapped a photo of the water during the first scrubbing, as you can imagine this required a few water changes. YUCK. Here is my How to Prep Painted Furniture. 
Little Steps
Before I was able to start painting I decided to remove the backing on the top half of the piece to make it easier to get inside. It was attached with long staples that were all removed with my handy pliers.


It’s always easier to work on a piece like this with the backing removed. Luckily the backing on this piece is made of wood, on some vintage pieces, it’s made of cardboard requiring a complete replacement of the back.
Another thing I found a little odd or funny was that when I removed the shelves from inside the cabinet area they didn’t match, at all. I’m assuming someone replaced a few over the years. 
The Fun Part – Paint
Once the repairs, cleaning, and prep were complete it was finally on to the good stuff. This first layer of this painted sideboard is a navy blue base.
You can find great quality furniture paint online HERE. An added bonus, when painting furniture, you want to make sure to use a quality non-toxic furniture paint. 
After two base coats of navy I then custom mixed a deep teal and added a full coat over the entire piece. Since I don’t have any paint stirrers left I stole some simple wood shims from my hubby’s shop to stir up my paint. 
High Lights and Details
The highlights were then done with a small artist brush, or more specifically a makeup brush. I bounced around between colors and added paint in all of the crevices of the piece. These details aren’t noticeable from afar and are done to be subtle.
I also added a few layers with the same mixture to add a sort of striations to the piece. By adding very soft layers I’ve added a subtle appearance of striations which give the piece depth.


If you prefer a video tutorial, there is a ONE HOUR long video tutorial on blending and layering paint available in my shop here: Layering Paint Video
The Hardware
The hardware was removed and refreshed to a matte black. I’ve done a step by step tutorial on the process of cleaning, prepping and painting the hardware that you can see here. 
Sealer
Once the highlights and details were finished the piece was sealed for protection with a black tinted sealer. You can easily add a small amount of black paint to your clear sealer to achieve this as well. This creates a soft black glaze appearance on the flat areas and adding a bit more depth in the crevices.


Staging Dilemma
Due to the height of this painted sideboard, I was unable to put it together for photos. The height is 80″ whereas the height in my staging area and shop are 78.5″, so what’s a girl to do?
 The painted sideboard was delivered to its forever home and looks great in its new spot!
This was probably one of the top 5 of most damaged pieces that I’ve worked on.. stick a fork in me, I’m done!
For another oversized makeover that was too large to stage check out The Ceiling is Too Low for the China Cabinet.

Don’t Forget – Follow Just the Woods :
FACEBOOK * INSTAGRAM * PINTEREST
Subscribe to our mailing list here: [mc4wp_form id=”1340″]
PINTEREST PIN READY TO SHARE

Beautifully painted. The added teal color makes all the difference.
thank you so much!! xoxo
Wow! You are amazing! I am not talented or creative in anyway and I would have no idea where to begin on something like this. I envy you, seriously gorgeous job! #familyjoy
aww thank you so much for such a sweet compliment!!
This really is a beautiful piece. And I love the extra ‘toning’ you did here and there. Sometimes sanding distressing can churn up more than your really want, and the over-brushing techinique you used works so well for a controlled outcome. Very nice, thanks, Sandi
Thank you so much Sandi, and I agree 100% about distressing.. I am a fan of light distressing but sometimes it can get tricky especially with curvy twisty legs 🙂
I love the barley twist legs. Gorgeous piece. Well done
Thank you! I love barley twist legs too 🙂 thanks for stopping by xoxo
This looks great! I have a couple of dressers that I need to do this to but I’m intimidated to take on such a big job 🙂 #familyjoy
thank you! I hear you completely! This was a huge project and I tend to prefer a bit smaller. Once they get this big they are way too heavy for me 😉
Kandace, you have incredible patience! Great job on this piece! Thanks for sharing at Dishing It & Digging It!
thank you and thanks for stopping by xoxo
Wow! This is just gorgeous! What a transformation. I was just reading your post on refreshing the hardware and thought it was excellent. Thank you for sharing on Family Joy Blog Link-Up Party. Have a great week!
thank you!! xoxo
What a great find! Gorgeous piece, I’m not so sure I would of painted it. The blue was perfect though.Thanks for linking up to Merry Monday! Sharing on Twitter! Have a great week!
Kim
thank you! It was is no condition to be left alone. lol Damage with a capital D 😉
What a beautiful job Kandice! I’m sure the customer was very pleased. I also read your post on the knobs too. Impressed with your skill.
thank you so much Florence!! xoxo
Such a beautiful transformation. Great job!
thank you Debbie!
The piece is gorgeous and worth the effort you put into it. And how sweet of Doug to be so helpful.
thank you so much! and yes he was a total life saver 🙂
First it was an impressive piece to begin with, what an awesome find. You really babied it and the work paid off for the result you achieved. You had my heart racing a little when you said you let Doug come with you…glad it worked out 🙂
thank you so much! I know right.. I always tell people don’t do what I do (as far as meeting up with strangers lol)
That turned out really well- I love it! When you applied the teal over the entire piece, could you tell it was there over the dark blue? I’m always fascinated with techniques, and this one is really nice.
thank you. the teal is very subtle, I would say it altered the shade of the blue rather than giving it a teal appearance if that makes sense
Turned out beautifully; I love the color!
Thanks so much for sharing at AMAZE ME MONDAY!
Blessings,
Cindy
What an amazing transformation!!! Your attention to the fine details make this piece wonderful!!! Thanks for sharing at TaDa Thursday!!!
This turned out great and the colors are gorgeous.
thank you so much!!
That is one gorgeous piece of furniture and you did a great job with it! Thanks so much for sharing at Welcome Home Wednesdays!
thank you so much!! xoxo
You did a beautiful job choosing the paint color and painting this lovely piece. It looks wonderful in its forever home. Thank you for sharing your fabulous makeover at Vintage Charm.
thank you so much!
Beautiful. WOW. Amazing difference. Color crush. Restored with love. Perfection. These words rolled through my mind as I read this post. What a testimony to your tenacity and expertise. Great job, girlie. Thanks so much for linking to Friday’s Furniture Fix. Susie from The Chelsea Project.
thanks so much! xoxo
Hello. I LOVE this piece. The color is exactly what I’m looking for to paint a dresser. Would you mind answering a few questions for me? Do you use regular paint brushes to paint or a combo of roller, brushes, foam or bristle? The highlights you applied were using what color? Just the jade? What tool did you use to apply the protective finish? The round brush pictured or a rag?
Thanks!
Thank you! I only used brushes for this.. the main brush was a flat cling on brush, (no rollers or foam brushes at all).. the highlights were jade and then a mix of jade and sailor. The protective finish was applied also with the flat cling on. There are links in the post to the paint as well as the artist brush. You can also find the paint and brushes on my website here:
Paint – https://www.justthewoods.com/shop-paint/
Cling On Brushes – https://just-the-woods.myshopify.com/collections/cling-on-brushes-1
Artist brushes – http://astore.amazon.com/wwwjustthewoo-20/detail/B00J86UIK4
Hope that helps!
Beautiful!
This is the exact piece my grandma has – we’re trying to give it a price point. I’m not having much luck. Any recollection on what you paid for it?
Jessica, Im sorry but I honestly don’t remember.