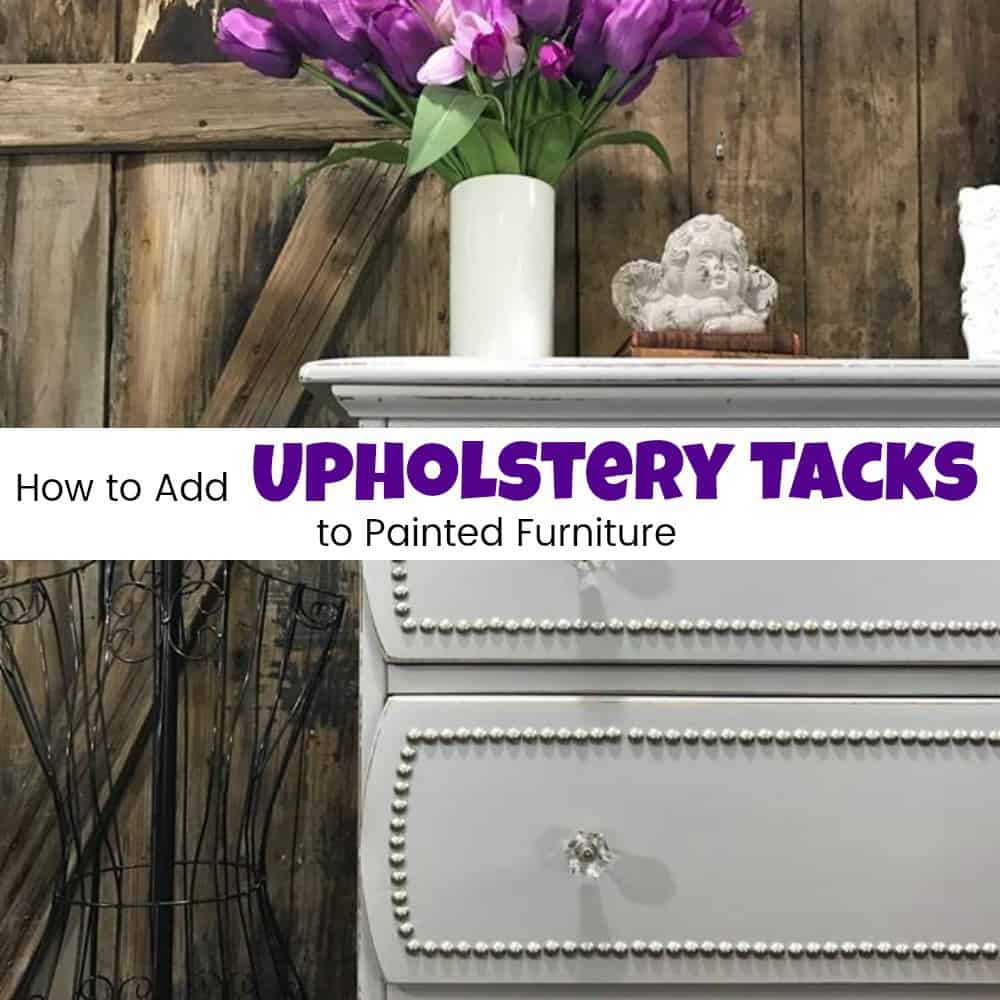
How to Make Your Furniture Extraordinary with Upholstery Tacks
How to Make Your Furniture Extraordinary with Upholstery Tacks
Upholstery tacks make this makeover go from “oooh” to “oooh la la.” This transformation leaves the ‘after’ almost unrecognizable from the ‘before’. It’s truly amazing how much of a difference adding upholstery tacks to a furniture makeover can make. But, don’t get me wrong, it didn’t come easily. I’m inviting you to come along this little journey with me and witness the good, the bad, the ugly and then the beautiful. There really is no other way to describe it. There are also, not one but TWO added bonuses as we go on. I’ve included a video tutorial on how to add the upholstery tacks and my talented furniture fixer-upper friends are joining us today as well.

Disclosure: This post contains affiliate links for your convenience and sponsored links by D Lawless Hardware. Click here for my full disclosure policy.
The Unfinished Vintage Dresser
Can you believe that this is the same dresser? The original is solid maple, with these giant round wooden knobs. I was afraid that no one would want this dresser because they wouldn’t be able to see beyond the hardware. Boy, was I wrong?

I secretly love the knobs, but not on the dresser. I’m hoping I can think of a unique way to use these knobs on something, somewhere, somehow. They measure just shy of 3″ and if you have any suggestions I’d love to hear them. 😉

To my somewhat surprise the dresser was claimed rather quickly by a sweetheart of a customer of mine. She even had an inspiration piece in mind which helped to give us something to work with while coming up with a design plan. After some brainstorming, I sent her a photo of a nailhead makeover that was done by my friend and fellow fixer upper Jen at Girl in the Garage. My customer fell in love and we were well on our way. Here is Jen’s makeover that sealed the deal for this one: Nailhead Vanity Makeover.
How to Make Your Furniture Extraordinary with Furniture Tacks
Materials Needed / Source List
- Cling On Paint Brush
- Shop Vac
- Flexible Sandpaper
- Wood Glue
- Pewter Upholstery Nailhead Trim
- I used single tacks, but you can also find them in roles. There are more options HERE
- Quick Fancy Nail Spacer
- Tack Hammer
- Tack Lifter
- Cutting Mat
- Exacto knife
- Daddy Vans Furniture Polish
- Textured Wallpaper
- Wooden Button Plugs
- Hardware Template
- Frog Tape
- Small artist brushes
- Clear Crystal Hardware Knobs
- Find all of my favorite tools and products on my Amazon Page here
Preparing the Dresser for an Upholstery Decorative Makeover
The first step, as always is to prep the dresser. A quick tip that I like to do when removing the drawers is to number them with chalk on the underside so that I make sure they all go back in the right order. I share this and many other tips in my Secrets and Tips for Painting Furniture.

The hardware is also removed and drawers taped off as I then I followed my standard process of How to Prep Painted Furniture. Though many chalk type paints claim ‘no prep’ I always play it safe and prep everything, no matter what. Extra prep can never hurt.

I produced so much sanding dust that rather than wipe it all over the shop floor I use my shop vac to suck up the bulk before cleaning.

While prepping the dresser I noticed that one of the button plugs on the lower front panel had been missing. That’s not good. 🙁

So I grabbed Layla’s plastic pink step stool and started climbing around and searching through the shelves in my shop. I know I have these somewhere. Finally, up on the top shelf, I found them! Whew. It must be my lucky day because they are even the right size.

A little wood glue and the button plug is snug as a bug in its place.

Missing button plug? What missing button plug?

Painting the Vintage Dresser
Once the dresser is fully prepped the body and drawers are all painted in a super soft gray. You can find great color options and quality furniture paint online HERE.

Since the color is very light, I actually paint three coats making sure to lightly sand in between each coat with a fine grit sandpaper. Sanding in between coats creates a baby-soft finish.

The dresser is then distressed and sealed using a clear matte sealer. There are also many sealers available online HERE. I can now consider the easy part complete, and on to the fun stuff.

Here is a full tutorial with VIDEO showing how I seal my painted furniture projects: Sealing Painted Furniture

New to painting furniture and not sure where to start? Start at the beginning with How to Paint Furniture – a Beginners Guide.
Marking the Border to Add Upholstery Nails
After measuring the drawers I came to the conclusion that this makeover would need approximately 700 upholstery tacks. That’s when I started to question my own sanity and what I’ve gotten myself into. Once they arrived, yay for free shipping; I also realized that we had to be mindful of how thin the outer edges of the drawer sides are and make sure the nail heads don’t go all the way through.


One inch from the edge is the safest measurement for the nailhead trim border.

A 1″ border was added to each drawer front using a sharpened pencil and my hardware template.

The template worked great for the bottom four drawers.

But since the top drawer has extra curves the template simply wouldn’t work and I have to get extra creative. With a large paper clip, a rubber band and pencil I made a one-inch spacer guide to border the smaller curved areas. Not fancy by any means but it got the job done.

Nailing in 700 Upholstery Tacks
This is where I settled in for the long haul and started one at a time nailing in the upholstery tacks. I grab my upholstery tools and get started. I’m using single decorative upholstery tacks but you can also use upholstery tack strips to make your life easier.

Using the quick fancy nail spacer I am able to line up placement for each nailhead. The wide end allows me to find my place.

Where the narrow end helps keep the nailhead straight. allowing me to hammer in the decorative furniture tacks.

I’ve created a video tutorial explaining and showing how I accomplished this. The video even shows an oops and how I recover from it. Please bear with me, I don’t start explaining in the video until about one minute in – don’t ask me why, because I have no idea. 😛
Problems that Occur when Nailing in Upholstery Tacks to Furniture
Like I said, this makeover did not come without issues.
- Issue 1 – Every so often a nailhead would go weeble when I wanted it to go wobble. When this happened I used my tack lifter to remove the naughty nailhead. Since the drawers have already been painted and sealed I want to make sure not to damage the finish. So a clean, I promise the rag in the photo really is clean, is placed down under the tack lifter before removing the tack.
 The rag protects the finish while being able to safely remove the upholstery tack.
 - Issue 2 – Splitting Wood – Insert tears of despair here. Naturally, when nailing into wood there are small fine hair splits which is to be expected. But, as I neared the edges of the drawers (not always, but it did happen a few times) the wood split all the way to the end. As if nailing 700 nailheads wasn’t enough to drive someone insane, now there are repairs and touch up. If you want to decorate your furniture I suppose there will be obstacles. As I gathered my composure, wood glue and a few bad words I used a small artist brush to squeeze wood glue into the fine split.After the wood glue, I repair and fill the split. You can use any wood filler for this part. Here are two wood fillers that I like for small repairs (HERE) and (HERE). Since we already painted, make sure to wipe excess with a damp cloth before it dries so the filler only sits in the split. Of course, once dry it is touched up with the light gray paint and sealed again. Once all of the upholstery tacks are nailed in and the nailhead trim is complete on all five drawers I am left with a whopping 5 leftover nailhead tacks. I think it’s safe to say I estimated pretty darn well. I can’t lie though, in addition to the five leftovers I did have a handful of ‘oops’ tacks as well.
 The rag protects the finish while being able to safely remove the upholstery tack.
 As I gathered my composure, wood glue and a few bad words I used a small artist brush to squeeze wood glue into the fine split.
 After the wood glue, I repair and fill the split. You can use any wood filler for this part. Here are two wood fillers that I like for small repairs (
 Of course, once dry it is touched up with the light gray paint and sealed again. Once all of the upholstery tacks are nailed in and the nailhead trim is complete on all five drawers I am left with a whopping 5 leftover nailhead tacks. I think it’s safe to say I estimated pretty darn well. I can’t lie though, in addition to the five leftovers I did have a handful of ‘oops’ tacks as well.
Replacing Vintage Hardware
Those chunky round knobs will not be returning to this dresser. Instead, gorgeous clear crystal knobs courtesy of D Lawless Hardware are added to the drawers. These knobs are the ying to the nailhead trim’s yang.

Lining the Inside of the Drawers
Another small and rather insignificant issue compared to the others above was the inside of the drawers. Of the five drawers, four of them are nice and clean and in great shape. Yay.

But four out of five isn’t five out of five. The top drawer is a bit, well, ick. I’ve certainly seen worse, and it’s not horrible, but it’s not pretty like the other four. So I decided to line them. If you prefer not to line them you can always preserve them. I show you how in How to Save Wooden Drawers.

I grabbed a roll of very pretty textured wallpaper in a damask pattern and my cutting mat to measure out the pieces. The wallpaper is placed pretty side down to avoid me making any marks on the pretty side while I cut.

A piece of wallpaper is cut to size for each of the five drawers and placed inside.

To help prevent them from curling up I used my fancy weights to keep them flat. The main reason that I did not seal them into the drawers is because it was a surprise for my customer. We hadn’t discussed lining the drawers and I wanted her to be able to remove them if she so chose. Though, I don’t think she will. If you want them to stay put they can be easily affixed in the drawer with spray adhesive.

The liner is simple and pretty and adds to the overall feminity of the dresser makeover.

Furniture Quick Tip
A quick note about vintage wooden dressers that I’ve also mentioned in my masculine painted dresser makeover. Many vintage dressers have wooden drawer tracks, and when wood rubs against wood it could stick over time. None of these drawers stuck but as an added precaution, I rubbed all of the tracks on all of the drawers and any spot where wood rubbed against wood, with Daddy Vans Furniture Polish. It’s a soft all natural beeswax that smells lovely and after a small application, the drawers glide like a dream.

The End Result of How to Make Your Furniture Extraordinary with Upholstery Tacks
This makeover tested my patience, as Im sure it would anyone’s, but I learned from it, and my customer loves it. When she brought her dresser home and then messaged me that she is in love it made all the hammered fingertips and oops worth it.


[clickToTweet tweet=”Make your Furniture Extraordinary with upholstery tacks. Even if its 700 of them ” quote=”It takes an over an hour per drawer to hammer in all these nailheads but it takes just a second to share with your friends” theme=”style5″]

Check out all of my furniture projects with over 90 painted furniture makeovers: Stunning painted furniture ideas.


If you love the glamorous touch of crystal knobs and decorative nailheads on your furniture then you will adore the Best of Hollywood Glam Furniture for your Home!


Love the look of a glamorous silver chest of drawers? Find them online (HERE)


Wait! Don’t Go! It’s that time of the month again for:
Furniture Fixer Uppers
A few of my creative and talented blogger friends and I have joined together in our monthly Furniture Fixer Uppers share. Let’s see what my friends are up to! Make sure to click the links below the image to check out all the amazing projects that my bloggy girls are working on this month.

- Petticoat Junktion
- Confessions of a Serial DIYer
- Girl in the Garage
- The Interior Frugalista
- Prodigal Pieces

Don’t Forget – Follow Just the Woods and Share this post to Inspire others:
FACEBOOK * INSTAGRAM * PINTEREST
Subscribe to our mailing list here: [mc4wp_form id=”1340″]


Oh Kandice, not only is this project gorgeous, but the tutorial is superb! Full of tips and tricks and some tools that are now on my list! My heart cringed when I saw the cracked drawer, but of course I knew you would fix that right up. Great photos, and all around stellar tutorial girfriend, your awesome project is this weeks feature at #FridaysFurnitureFix!
Holy thumbtacks, Kanice!! You took a Hansel and Gretl dresser and gave it one fabulous makeover! This is the prettiest piece of furniture I’ve seen in a long time. It looks really expensive. 😀 Thanks also for the great tutorial ! I’ve pinned …. but I’ll probably never attempt it! LOL Have a great weekend, Cynthia
thank you so much! hehe it was fun, but Im not sure I would do it again either. have a great weekend
Whoa! Kandice! That’s a LOT of work, but it turned out beautifully. Great tutorial and tips, thanks for keeping it real with what you learned.
We appreciate you sharing at Talk of the Town.
gail
pinning!
thank you so much Gail!!
This is such a dramatic transformation I can hardly believe it’s the same dresser. You must have the patience of Job to apply all of those upholstery tacks but the end result was truly worth it. I was also impressed by your make-shift spacer–very ingenious! I would love for you to share this great tutorial on our Share Your Style Party.
This is so beautiful! You have done an amazing job. The color is what I want to use in my bathroom.
Maria