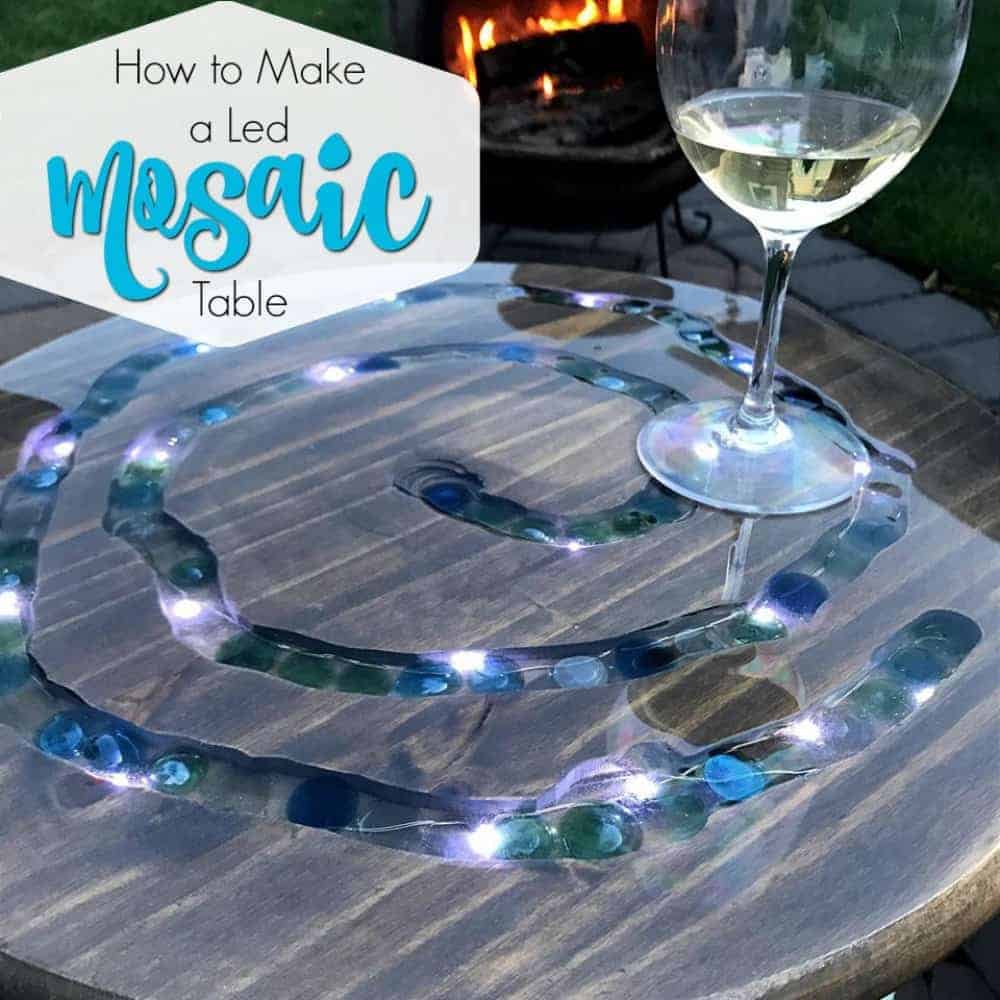
How to Make a Unique LED Mosaic Table
Make a mosaic table with glass gems and LED lights. With a router and string lights, you can make your own DIY mosaic outdoor table, sealed with epoxy glaze. See how to create a mosaic table top that lights up.
DIY mosaic table? Yes, please. Would you like to make your own mosaic table? How about a mosaic table with added LED lights? This mosaic accent table is so fun to make and the possibilities are endless. I am excited to join a great group of bloggers for the monthly power tool challenge. This months challenge falls under the theme “unconventional” meaning to build something with unconventional means. Examples would be to use concrete, pipes or glass. I will be building, and showing you how to build, a mosaic table using wood, metal, glass gemstones, and LED lights. This is unconventional to me for sure. Let me show you how easy it is!
Disclosure: This post contains affiliate links for your convenience. Click here for my full disclosure policy.
How to Make a Unique LED Mosaic Table
MATERIALS NEEDED / SOURCE LIST
Gathering Supplies to Build Your Mosaic Table
The first thing you need to do is gather your supplies. Keep in mind that you can choose any color or style of glass stones to use for the mosaic portion. You can also choose white LED lights, or colored. I decided to go with the white battery operated lights. You can also opt for plug-in lights. The world is your DIY oyster. 
It took approximately 4 different stops at different stores before finding this simple metal stool at a local decor store. I like the fact that it is metal, can hold weight, and the decorative pattern will make it easy to work with. The idea bounced around to use pipes or hairpin legs, but a metal stool for $10 is much more appealing to the wallet.

Preparing the Table Base
I intend to use this DIY accent table in the backyard in between my Adirondack chairs. It is the perfect size table to hold a glass of wine by the fire. I decided to use my Rust-Oleum indoor/outdoor spray that has been in my shop for quite a while. The color is called Ocean Mist, which is somewhat of a soft sea glass. 
Go ahead and spray your metal table base and legs. Wow, that was easy.
For more painted metal makeover make sure to check out How to Paint Metal – 10+ painted metal makeovers. 
Creating a Groove with an Electric Router
Lately, I’ve been having a great time using the router. If you have ever wondered what you can do with a router tool here you go. For this mosaic table, make sure to use a mortising bit for your router, as opposed to a decorative edge bit. A decorative edge bit was used when I recently built a new tabletop for a previous project. Click here to check out that project: Build a New Table Top. 
Using the router you can create a groove in the wood in any pattern you’d like. Clearly, I wasn’t going for perfection. 
Be prepared to get covered in sawdust. 
Feeling overwhelmed? You can always find mosaic tables already finished online HERE. But don’t give up yet, you can do this.
Building a DIY Mosaic Table with Lights
- Make sure to clear away all sawdust particles that are left on the wood. It’s time to add the LED mini string lights. With a small drill bit, drill a hole in the center area of the table. Make the hole just wide enough to feed the string lights through.

- Choose your stain for the wooden top. You can find great quality furniture paint and stain online HERE. An added bonus, when painting furniture, you want to make sure to use a quality non-toxic furniture paint.

- Flip your tabletop over and feed the string lights through the hole from the underside of the table. With the lights completely pulled through, place your metal stool in the center of the wood. Secure the table to the base with wood screws and washers. This is where the decorative pattern and mosaic designs on the stool top come in handy. The open spaces make it easy to drill small wood screws into the mosaic table top.
- Now you should have your wood stained, hole drilled, and tabletop secured to the base legs and the LED string lights are pulled through from underneath. The lights can then be placed in the cutout groove.5. Once the lights are pulled through and in place go ahead and fill the groove with your mosaic gems or glass tiles.


 5. Once the lights are pulled through and in place go ahead and fill the groove with your
Make sure to place the lights on the table first. By adding the mosaic gems after the led lights you can use the stones to help hold down any parts of the wire that may lift up. (I hope that makes sense) 
Sealing the Mosaic Table Top with Epoxy Glaze
Once the lights and stones are in place you can seal the mosaic table top with Famowood or an epoxy glaze of your choice. Famowood dries like glass and leaves a gorgeous clear finish. If you are unfamiliar with Famowood the best way to describe it is like the stuff that you would see on a bar. It is equal to 7o coats of varnish but much easier and faster to use.

Make sure that you follow the mixing instructions on the box when you use Famowood.
You can expect the epoxy glaze to drip while it is still wet. A drop cloth is a very good idea at this point. Since we drilled a small hole in the center to feed the lights through the glaze will also drip through the center. A simple fix to protect the battery pack from getting messy is to cut two plastic cups and wrap around the battery pack until the glaze cures. Sometimes doing the simplest thing is the easiest and most effective.  Once the Famowood glaze cures on your mosaic table top it will be clear and smooth like glass.

Last Step in Building a Mosaic Table with Battery Operated Lights
Remember that battery pack that was dangling from the center? To secure the battery pack, flip over your new table and grab a hot glue gun. Hot glue the battery pack to the underside of the table. 
Enjoy Your DIY Mosaic Table with LED Lights and Glass Gems
Our unique mosaic bistro table sits in between my Adirondack chairs out in the yard. It adds the perfect amount of ambiance with the soft LED lights and pretty mosaic glass gems.


Power Tool Challenge Team
You know how much I love new challenges and I’m so excited to be joining this group of talented bloggers for the power tool challenge. Make sure to click on each link and check out their projects. 
My Repurposed Life How To Make A Drop Cloth Hammock
My Love 2 Create How to Make A Jewelry Holder
H2OBungalow DIY Copper Tin Can Candle Holders
Create and Babble Copper and Wood Magazine Holder
Domestically Speaking DIY Wood Tool Box
Virginia Sweet Pea DIY Industrial Pipe Bookshelf
Just The Woods DIY LED Wood Mosaic Table

Don’t Forget – Follow Just the Woods and Share this post to Inspire others:
FACEBOOK * INSTAGRAM * PINTEREST
Stay connected! For more tips and tricks sign up here : [mc4wp_form id=”1340″]

Painting Outdoor Adirondack Chairs with HomeRight Finish Max Extra
What a creative project! My husband and I are sitting at our computers right now drinking coffee and he is loving your project. We both love the LED lights and the finish you gave this piece with the Famowood Glaze Coat. When you have visitors to your outdoor space, they all are going to love seeing this cool table light up at night. Great project!
thank you! My daughter is trying to steal it to make it a “night light table” in her bedroom lol
Kandice,
What a clever project. I love the lights, the glass pieces and that epoxy glaze! I’ve always wanted to use that on something, but haven’t made the plunge yet.
great tutorial!
gail
ps pinning!
thank you Gail! I want to put that epoxy on everything now lol
This is awesome Kandice! I’ve done it again 🙂
This was one of the most unique and creative items I have seen! I love the idea and so many possibilities.
I would never have thought to do this………very nice!
thanks terri!!
I love this project! How fun and colorful to add the glass dots along with the lights. Loved seeing your router and pics too, I’ve been thinking of getting one. Super creative project this month. Welcome to the team, we are so happy to have you!
thank you so much and thanks for having me!
What a fabulous table, Kandice! I can imagine how cool it looks after dusk too. Pinned
Holy moly! This is amazing and I know my husband would absolutely love it. Definitely going to show him! 😉 Pinned!
awesome! thank you!
What an awesome project!!! So perfect for outdoor living!
thank you so much!
I love this project, I bet it looks beautiful when it’s completely dark outside having a nice beverage with your honey. Don’t you just love those pine rounds? They have so many uses.
I’d love to join you in one of your future challenges if you have room for one more 🙂
thank you Toni!! This was my first month participating in the power tool challenge (im new to it myself) but Ill let you know if there are any others on the horizon 🙂
Thanks Kandice, that would be great 🙂
This table is gorgeous! I love the way the lights make the gems sparkle even more. Clever idea of adding the lights alone with the gems.
I’ve tried varnish, and sanding between each coat to get the bar like finish. Didn’t work very well, and it is a lot of work. I will have to get some of that Famowood glaze next time. Thanks so much for sharing your beautiful table, and the tutorial.
This is a great table! I love how you added the lights!
I love this table, I have a question though. How has it held up outside?
thank you! We bring it into the shed when not in use to avoid taking chances with bad weather