How to Make Your Painted China Cabinet Amazing with Decoupage
A painted china cabinet with fabric decoupage is the perfect addition to my new living room. As soon as I got this vintage china cabinet I knew that I wanted it for myself. We have a bookcase in the living room that I intended to replace with this piece and fill with books. I love the look of a painted china cabinet filled with books. No one says you have to keep china inside. The before and after of this transformation gets me every time.

The Before – Unfinished Vintage China Cabinet
This china cabinet is vintage, in great shape with fixed shelves and dovetail drawers. It also had this neat metal webbing of sorts over the side glass panels. And it also separates into two pieces which makes it much easier to get into my shop to work on.
 Disclosure: This painted china cabinet post contains sponsored links from Spoonflower and affiliate links for your convenience. Click here for my full disclosure policy.
Materials Needed / Source List:
Let’s Get Started and Pick up the China Cabinet from Storage
We have been redesigning our entire living room. We’ve removed all of the old furniture, painted the walls and this piece will be a new addition to the room. We had the old layout for 7 years and were in desperate need of a change. When we went to pick up the china cabinet from storage, where it had been patiently waiting for its makeover I had hubby help me. I admit that I was a bit uneasy with hubby’s “babe its fiiiiine, don’t worry” as we loaded it in the truck. I’m the type that likes everything tied down tight, where he prefers to ‘wing it’. Can you see why I was concerned?
Thankfully we made it back without incident and I could get started!
Prepping China Cabinet for Paint
The first thing I did was pop off that backing for easier access to the inside of the cabinet. My tack puller and teeny tiny flat head screwdriver work best for this. The entire piece was then prepped for paint, this is my process for How to Prep Painted Furniture.
Painting the China Cabinet
Once the back was removed I was able to get easy access to the inside of the cabinet which was painted in Tahoe which is a very light gray. This color has been quite popular lately, I recently completed a custom desk in this color, you can see the desk by clicking here: Gray Painted Desk.

Wait, rewind. Before I could paint, I had to remove those metal pieces that covered the glass. They are really cool, but I don’t think they will work with the end result that I have planned. 
I also had a loose piece near the top of the china cabinet that needed to be secured. But since it was a tight space I used my wood glue syringe to get just enough wood glue in the area without making a mess. 
The hardware was removed and a long screw was placed in the hole and taped to make sure that even when closed I can still get the doors opened when needed.


Painting the China Cabinet
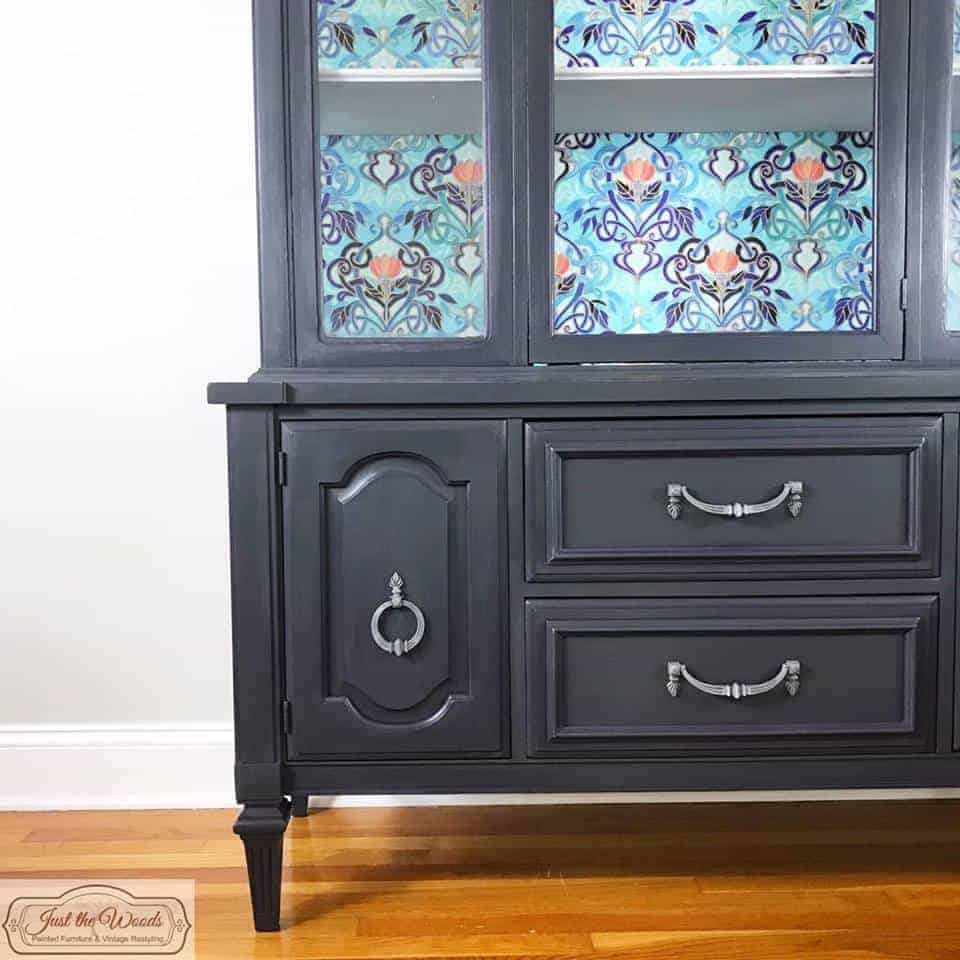
I decided to use up the leftover charcoal paint that I had from a previous custom painted china cabinet. You can check that makeover – Vintage China Cabinet if you’d like. The color was a mix of gray and black, but I didn’t want a straight charcoal so I also added some navy blue as well as cranberry to give the color a subtle purple undertone. I also decided to paint the inside of the drawers as well as the side cabinets in a pretty blue. 
The gray was missing that little something extra, so I then added a purple glaze to the crevices using a small artist brush.

Decoupage Fabric Backing
You know how much I love decoupage. For an additional wow factor, I then decoupaged a gorgeous fabric to the back of the china cabinet that was so generously supplied by Spoonflower. The pattern is absolutely perfect for our new color scheme in the living room. You can find this same pattern HERE. If you have never used Spoonflower before then I can honestly tell you that they are amazing. The patterns can be ordered in fabric, wallpaper, or wrapping paper. The fabric can also be ordered in many different types and sizes. This was my first time using Spoonflower and I am in love. Find more inspirational decoupage projects here: DECOUPAGE


The Hardware – Painted Vintage Hardware
The original hardware was removed, cleaned and painted gray and then metallic silver. The hardware itself was and still is perfect for the piece. You can see my process of cleaning and painting hardware How to Prep, Clean & Paint Hardware.


Removing Paint From Glass
I was able to remove the center glass panel from the door, but I was unable to remove the glass from the side panels. Normally I use frog tape to cover the glass, but this time I was a bit lazy and painted the edges all willy nilly and got paint on the glass. So I had to break out my flat razor to remove the paint from the glass. This worked like a charm! 
Click here for more methods to paint mirrors or glass: How to Paint a Mirror Frame (or Glass) the Easy Way. 
The Result – Gray Painted China Cabinet with Decoupage Backing
There will be no books in here, sorry kids. This painted china cabinet is too pretty to fill with books.


For more painted furniture before and after projects, and makeovers, make sure to check out all of my chalk paint furniture tutorials with over 90 projects here: The Ultimate Guide for Stunning Painted Furniture Ideas


This painted china cabinet is decoupaged with fabric but if you are working on a smaller project tissue is a perfect option:


If bold and colorful is not your thing, no worries! Click here to find plenty of neutral china cabinets: HERE

If you love Decoupage projects make sure to check out Fifteen Fabulous Decoupaged Makeovers post: Decoupaged Furniture Makeovers, and if you love gray painted furniture then you don’t want to miss Fifteen Fabulous Gray Painted Furniture Projects post: Gray Painted Furniture Projects.
Care to See the Other Projects of the Room Makeover?
Like I mentioned these tables were part of our entire living room makeover. To see more projects related to this living room makeover, check out these other posts:
******************************************************************************************

Don’t Forget – Follow Just the Woods and Share this post to Inspire others:
FACEBOOK * INSTAGRAM * PINTEREST


Learn to Decoupage with All Things Decoupage Ebook by Just the Woods
What a great tutorial Kandice, I love the fabric choice and have to head on over to spoonflower for my next project! I adore the purple stain detailing – lends that perfect touch! Thanks for sharing at Fridays Furniture Fix!
thank you Brenda!!!
The cabinet looks fantastic. I love the fabric from Spoonflower. Will you still want to put books on the shelves?
no way Debra!! I decided to get a small bookcase for my daughter’s room for their books and left the colored glass bottles in the cabinet for me 🙂
Looks fabulous! How do you seal your paint? Or do you?
thanks Barb, I do seal everything. I use Kristi Kuehl Pure Home Paint (I also sell the line and have it on my website). I try to link all products used in each makeover 🙂
I’m floored! This china cabinet is the EXACT one my grandmother had -EXACT! And it now sits in its original condition in MY dining room. I’ve wanted to redo it, but since it’s such a special piece, I’ve been waiting for the right inspiration and direction… so thank you! This definitely gives me something to consider. And, I have the matching buffet and the table is in storage… so many ideas!